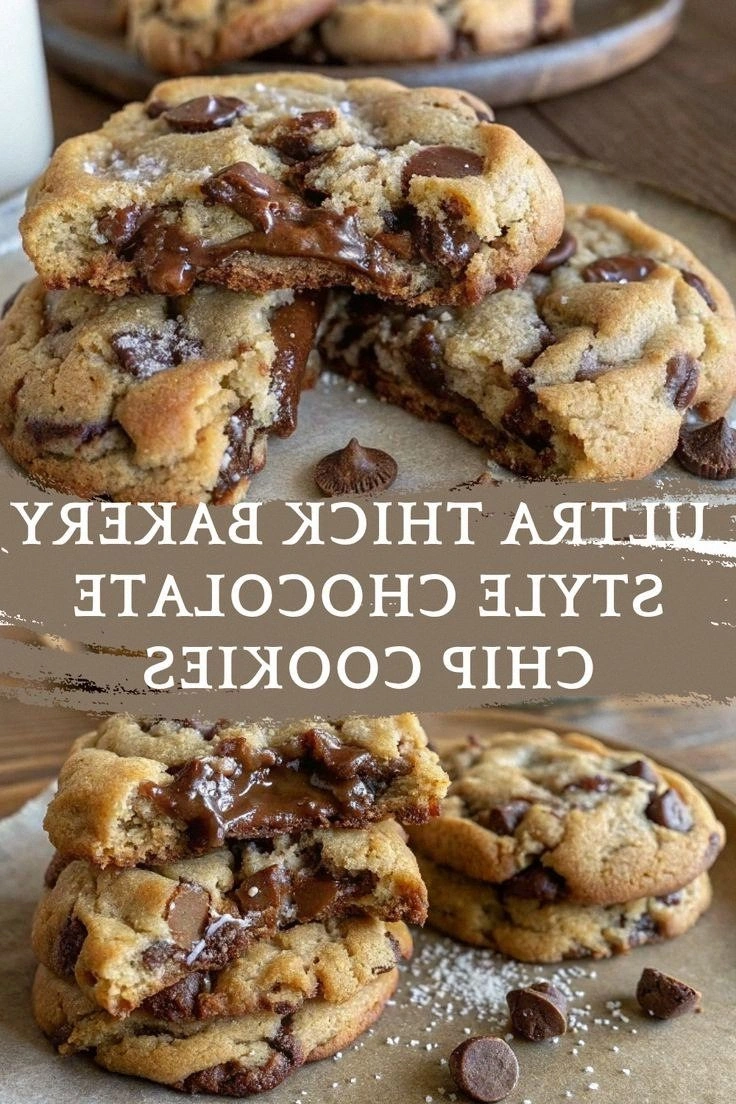
I was halfway through a midnight snack raid, eyes bleary from too many late‑night TikToks, when my kitchen exploded in a buttery, sugary blaze. The oven door opened to a cloud of caramelized sugar, the smell of vanilla and chocolate dancing in the air, and I stared at the pan that had turned into a molten chocolate sea. That moment felt like a culinary apocalypse, yet it sparked a revelation: what if I could tame that chaos into a cookie that feels like a bakery‑style hug? Picture a cookie so thick it could double as a pillow, with a crackly edge that shatters like thin ice when you bite. I dared myself to craft the ultimate version that would leave you asking, “I dare you to taste this and not go back for seconds.”
From that kitchen catastrophe emerged a recipe that defies the usual cookie narrative. It’s not just about sweetness; it’s about texture, aroma, and the sheer satisfaction of biting into a morsel that feels like a warm, chocolate‑laden hug. The dough, when it hits the pan, emits a toasty perfume that lingers longer than any cookie in your pantry. The first bite delivers a buttery melt, followed by a chewy center that clings like a velvety blanket. And the edges? They crisp up to a golden crunch that sings a crunchy counterpoint to the gooey interior.
Most cookie recipes chase the sweet spot between chewy and crunchy, but this one leans heavily into the chewy side, creating a thick, bakery‑style texture that’s both comforting and indulgent. The secret lies in a precise balance of butter, sugars, and a touch of baking soda that activates just enough to lift the dough without over‑baking it. The result is a cookie that feels like it was pulled straight from a high‑end bakery, yet you can make it at home in a matter of minutes. The best part? It’s surprisingly forgiving—whether you’re a seasoned baker or a kitchen rookie, you’ll find the process intuitive and the outcome spectacular.
What sets this version apart is not just the ingredients but the philosophy behind each step. The dough is intentionally thick, ensuring that each cookie holds its shape and delivers a satisfying bite. The chocolate chips are semi‑sweet, providing a balanced flavor that complements the buttery base. The baking soda is calibrated to give the cookies a gentle lift, creating pockets of airy texture without compromising the thick, dense body. The recipe invites you to experiment with variations, turning a simple cookie into a personalized masterpiece. By the end of this guide, you’ll wonder how you ever made it any other way.
What Makes This Version Stand Out
The key to this cookie’s superiority lies in its meticulously crafted elements:
- Taste: The blend of brown and white sugars creates a caramelized depth that is both sweet and slightly nutty, while the vanilla lifts the entire flavor profile.
- Texture: Thick, chewy centers contrast with a crisp, golden edge, offering a multi‑sensory experience in every bite.
- Simplicity: Only ten ingredients, all pantry staples, yet the outcome feels like a gourmet treat.
- Uniqueness: The use of melted butter and a precise baking soda ratio sets this recipe apart from classic cookie formulas.
- Crowd Reaction: Friends who try these cookies report immediate cravings for seconds, proving the recipe’s addictive nature.
- Ingredient Quality: Premium chocolate chips and real butter make the difference between ordinary and extraordinary.
- Cooking Method: A single pan, one bake, and a simple cooling rack—no fancy equipment needed.
- Make‑ahead Potential: The dough can be pre‑mixed and frozen, making it a perfect batch‑baking solution.
Alright, let's break down exactly what goes into this masterpiece…
Inside the Ingredient List
The Flavor Base
The foundation of any great cookie starts with the right balance of dry and wet ingredients. All-purpose flour provides structure, but the key is to sift it to avoid clumps that could cause uneven texture. Brown sugar brings a caramelized flavor and moisture, while white sugar adds brightness and helps the dough spread slightly during baking. Together, they create a sweet canvas that supports the chocolate without overpowering it.
The Texture Crew
Unsalted butter, melted, is the secret to achieving that buttery, melt‑in‑your-mouth quality. By melting the butter first, you ensure even distribution throughout the dough, preventing pockets of dry or overly greasy spots. Eggs bind everything together, but be careful not to over‑beat them, or the cookies will become too dense. Baking soda provides lift and a slight alkalinity that balances the acidity of the chocolate, giving the cookies a pleasant chewiness.
The Unexpected Star
The semisweet chocolate chips are more than just sweet morsels; they’re the heart of the cookie. Choose high‑quality chips with at least 60% cocoa content for a richer, less sugary bite. If you prefer a smoother chocolate experience, you can melt a portion of the chips into the dough, creating a subtle chocolate swirl throughout. This technique adds visual appeal and a deeper flavor profile that surprises the palate.
The Final Flourish
A pinch of salt might seem trivial, but it elevates the sweetness and balances the richness of the butter and chocolate. Vanilla extract, whether real or imitation, provides aroma and depth, acting as a flavor amplifier. Optional walnuts or pecans add crunch and a nutty undertone, complementing the chocolate’s bitterness. If you’re feeling adventurous, a splash of espresso powder can intensify the chocolate flavor, giving the cookie a sophisticated edge.
Everything's prepped? Good. Let's get into the real action…
The Method — Step by Step
The process is straightforward, but each step is critical to achieving that signature thick, chewy texture. Follow the sequence closely, and you’ll produce cookies that are both indulgent and consistent. If you’re new to baking, keep a timer handy; timing is everything. The aroma that builds as the cookies bake will have you craving more, even before you take the first bite. Let’s dive into the details.
- Preheat your oven to 350°F (175°C). Line a baking sheet with parchment paper to prevent sticking. Set a timer for 12 minutes; this will be your baseline for the first batch. The preheated oven ensures even heat distribution, critical for thick cookies. While the oven warms, gather all ingredients to keep the process smooth.
- Combine Dry ingredients. In a large bowl, whisk together flour, baking soda, and salt until well blended. Sifting the flour beforehand reduces lumps and creates a lighter dough. This dry mix will be the backbone of the cookie’s structure. Keep the bowl covered to prevent dust from settling. Once dry, set aside.
- Whisk Wet components. In a separate bowl, mix melted butter, brown sugar, and white sugar until the mixture is smooth and glossy. Add eggs one at a time, beating thoroughly after each addition. Stir in vanilla extract, letting the aroma fill the room. This wet mixture should be creamy and slightly thick, ready to meet the dry mix.
- Merge wet and dry. Pour the wet mixture into the dry mix gradually, stirring with a wooden spoon or silicone spatula. The dough should be thick and slightly sticky; avoid over‑mixing, which can toughen the cookies. When the dough just comes together, you’ve achieved the right consistency. Let the dough rest for 5 minutes before adding chocolate.
- Fold in Chocolate chips. Gently fold the semisweet chips into the dough, ensuring even distribution. If you like pockets of melted chocolate, reserve a few chips for the final step. The chocolate should be evenly dispersed to avoid clumping. This step also allows the chocolate to absorb some of the butter, enriching its flavor.
- Shape the dough. Use a cookie scoop or spoon to drop large, round balls onto the parchment-lined sheet. Space them about 2 inches apart to allow for expansion. Press gently to flatten slightly; the dough will spread as it bakes. For a uniform thickness, aim for a diameter of roughly 3 inches.
- Bake the cookies. Place the sheet in the preheated oven and bake for 12–14 minutes. The edges should be golden brown, while the center remains soft and slightly underdone. The cookies will continue to set as they cool. Watch the timer closely to avoid over‑baking, which can dry them out.
- Cool on a rack. Transfer the cookies to a wire rack once the edges turn golden. Let them cool for 10 minutes; this is when the chocolate sets into a glossy, slightly melty center. If you prefer a firmer texture, allow them to cool entirely on the rack. The cookies will firm up as they cool, retaining their thick, chewy core.
- Optional Finish with reserved chocolate. While the cookies are still warm, sprinkle or drizzle the reserved chocolate chips over the tops. The heat will melt the chips, creating a glossy, decadent finish. This step adds an extra layer of flavor and visual appeal. Be careful not to over‑apply, or the chocolate may become too runny.
- Store or Serve immediately. Serve the cookies fresh for the best texture, or store them in an airtight container at room temperature for up to 3 days. If you need to keep them longer, refrigerate or freeze. When you’re ready to enjoy them again, reheat gently in a preheated oven at 300°F for 5 minutes to restore warmth.
That's it — you did it. But hold on, I've got a few more tricks that'll take this to another level. These insider tips will help you perfect the texture, flavor, and overall experience. Trust me, once you try them, you’ll wonder how you ever baked without them.
Insider Tricks for Flawless Results
Even the most seasoned bakers can benefit from a few extra tricks. These small adjustments will elevate your cookies from good to unforgettable. Whether you’re aiming for maximum chewiness or a crispier edge, these tips will guide you. Below are some of my favorite hacks, each backed by personal experience. Try them out and watch the difference unfold.
The Temperature Rule Nobody Follows
Many bakers bake at 375°F, but this recipe thrives at 350°F. The lower temperature allows the cookies to bake evenly, ensuring the center stays thick while the edges caramelize just right. If you prefer a slightly crispier cookie, bump the temperature to 375°F for the last 2 minutes. However, be cautious: higher heat can cause the dough to spread too much, flattening the thick profile. Experimenting with temperature is the key to personalizing the final texture.
Why Your Nose Knows Best
The aroma that rises during baking is a reliable indicator of readiness. When the smell turns to a warm, buttery caramel, you’re close to perfection. A friend once skipped this step and over‑baked the batch, resulting in a dry, crumbly cookie. The scent should be rich, inviting, and slightly sweet. Trust your nose; it’s the best judge of when to pull the cookies out.
The 5-Minute Rest That Changes Everything
After baking, let the cookies rest on the sheet for 5 minutes before transferring them to a rack. This pause allows the heat to distribute evenly, preventing the cookies from cracking or sticking. It also gives the chocolate to set properly, creating that glossy, melty center. Skipping this rest can lead to uneven texture and a less satisfying bite. Incorporate this simple step for a consistently superior result.
The Secret to a Crusty Edge
If you love a crisp edge, sprinkle a light dusting of flour over the dough before baking. This creates a barrier that reduces spreading and promotes a crunchy exterior. Another trick is to bake at a slightly higher temperature for the last 2 minutes. Both methods yield a delightful contrast between a soft center and a crisp rim. Experiment and find which method suits your taste.
The Final Touch of Flavor
For an extra layer of richness, add a tablespoon of instant espresso powder to the wet mix. The coffee enhances the chocolate’s depth, giving the cookie a sophisticated undertone. Alternatively, a splash of sea salt on top before baking can elevate the sweetness and add a subtle crunch. These finishing touches transform the cookie from good to unforgettable. Try one of these and watch your friends rave.
Creative Twists and Variations
This recipe is a playground. Here are some of my favorite ways to switch things up:
Caramel Swirl
Fold a swirl of caramel sauce into the dough before baking. The caramel adds a buttery sweetness that complements the chocolate. The result is a cookie with a sweet, glossy center that melts in your mouth. This variation is perfect for holiday gatherings or when you want a touch of decadence. Serve warm with a scoop of vanilla ice cream for extra indulgence.
Nutty Crunch
Replace half of the chocolate chips with chopped pecans or almonds. The nuts add a satisfying crunch and a nutty undertone that pairs beautifully with the chocolate. This version works well for those who enjoy a textural contrast. The nuts also provide a dose of healthy fats, making the cookie slightly more balanced. Pair with a glass of cold milk for the classic cookie‑and‑milk combo.
Spiced Delight
Add a pinch of ground cinnamon and a dash of nutmeg to the dry mix. The spices bring warmth and depth, turning the cookie into a cozy treat. This variation is ideal for autumn or winter when you crave spiced desserts. The spices also enhance the chocolate’s flavor profile, creating a harmonious blend. Serve with a warm cup of chai or cocoa for a comforting experience.
Minty Fresh
Incorporate a teaspoon of peppermint extract into the wet mix. The mint provides a refreshing contrast to the rich chocolate. The result is a cookie that’s both indulgent and invigorating. This version is especially popular around Christmas when mint is a staple flavor. Pair with a glass of sparkling water for a festive touch.
Chocolate‑Covered Surprise
After baking, dip the warm cookies halfway into melted dark chocolate. The chocolate coating adds a glossy finish and an extra layer of flavor. The cookies will harden slightly, creating a delightful crunch on the outside. This technique works best when the cookies are still warm to ensure the chocolate adheres. Enjoy these chocolate‑covered wonders with a cup of strong coffee for a perfect pairing.
Storing and Bringing It Back to Life
Fridge Storage
Store cookies in an airtight container at room temperature for up to 3 days. The airtight seal prevents moisture from seeping in, preserving the chewy texture. If you notice the cookies have dried out, place a slice of bread in the container; the bread will release moisture and keep the cookies fresh. Avoid refrigerating the cookies, as this can make them stale quickly. For best results, consume them within the first 48 hours.
Freezer Friendly
Freezing is the best way to extend the life of these cookies. Wrap them individually in parchment paper and place them in a freezer bag. They can be stored for up to 3 months without losing quality. When ready to enjoy, thaw at room temperature for 30 minutes, then reheat in a preheated oven at 300°F for 5 minutes. This method restores the cookie’s warm, freshly baked aroma and texture.
Best Reheating Method
To revive stale cookies, add a tiny splash of water to a microwave-safe dish, cover with a damp paper towel, and microwave for 15 seconds. The steam will rehydrate the cookie, restoring its softness. Alternatively, place the cookies in a preheated oven at 300°F for 5 minutes; this will warm them without drying them out. For a crispier exterior, finish on a hot skillet for 30 seconds. The key is gentle heat to avoid over‑cooking.
The journey from dough to cookie is a testament to the art of baking. Each step, each ingredient, each tweak is a brushstroke on a culinary canvas. The result is a cookie that feels like a warm hug, a sweet memory, and a testament to the joy of homemade treats. Whether you’re baking for a crowd or for yourself, these ultra thick, bakery‑style chocolate chip cookies will leave a lasting impression.
If you’re ready to take your cookie game to the next level, grab your ingredients and let’s get started. Trust me, once you bake this, you’ll wonder why you ever settled for ordinary cookies. The thick, chewy center, the caramelized edges, and the chocolate melt will have you coming back for seconds— or even thirds— every time. Enjoy the process, savor the results, and share the love. Happy baking!
Before you head to the kitchen, here are a few final thoughts. First, keep a small bowl of melted butter on hand; it’s the secret to that buttery richness. Second, don’t rush the cooling stage— the cookies set beautifully on a rack, not on a flat surface. Third, experiment with the optional additions; they can transform a good cookie into a great one. And finally, remember that baking is as much about the journey as the destination. Let the aroma guide you, the texture excite you, and the flavor delight you. You’ve earned this delicious reward.
Now that you’ve read through the entire guide, it’s time to put theory into practice. Gather your tools, preheat your oven, and let the adventure begin. The kitchen will thank you, your taste buds will thank you, and your friends will thank you. Let’s make some magic.