When the Christmas lights flickered on the living room wall, I was still trying to salvage a batch of over‑baked, dry cinnamon buns that my friend had dared me to finish. The kitchen was a battlefield of flour‑covered countertops, a pot of cold milk, and a yeast packet that had been left in the back of the fridge for months. I stared at the dough, feeling the tension of a recipe that had always felt a touch too ordinary, and I decided then and there to turn the ordinary into the extraordinary. That night, the scent of warm butter and vanilla filled the air, and I realized that the secret to a truly memorable roll lies in the subtle interplay of texture, flavor, and timing. The moment the dough rose, I could taste the promise of a soft, pillowy interior that would melt in your mouth like holiday snow on a hot mug of cocoa. I was determined to share that promise with everyone, because I knew the world deserved a cinnamon roll that was more than just a sweet treat—it was a holiday memory in the making.
Picture this: the dough glistening like a freshly fallen blanket of snow under the kitchen light, the gentle hum of the mixer, and the faint scent of caramelized sugar drifting from the oven. The first bite is a burst of sweet cinnamon, the buttery crumb a velvety whisper that keeps you reaching for more. The aroma alone is a cue to the senses, pulling you into a space where time slows and the world feels just a little bit warmer. I swear, the sound of the rolls sliding into the pan is like a tiny drumbeat of anticipation that echoes through the house. As the oven timer ticked, the kitchen filled with a scent so rich that even my neighbor's dog started sniffing the air. The anticipation is almost tangible, and the promise of a soft, gooey center is the ultimate comfort for a cold December evening.
What makes this version stand out is not just the classic recipe—it’s the meticulous layering of techniques that elevate each roll from good to unforgettable. I’ve refined the dough’s hydration, perfected the cinnamon‑brown sugar filling, and discovered a glazing method that delivers a silky finish without heaviness. The result is a roll that rises like a snowflake, with a crisp edge that cracks like thin ice when you bite into it. I dare you to taste this and not go back for seconds, because the balance of sweet and spice will keep you coming back for more. The dough’s airy interior is a testament to the right yeast activation, while the buttery glaze gives a subtle sheen that makes each roll look as good as it tastes. If you've ever struggled with a roll that turns out dense or uneven, you're not alone—and I've got the fix that turns every batch into a masterpiece.
Most recipes get this completely wrong by over‑mixing the dough, using too much sugar, or forgetting to let the dough rest properly. That small misstep can turn a soft, fluffy roll into a dense, chewy one that feels like a brick. I’ll be honest—I ate half the batch before anyone else got to try it, and that was because the rolls were so good they practically pulled themselves off the tray. The secret is in the timing: let the dough rise until it’s doubled in size, then roll it out with a light touch, and press the filling in gently so it spreads evenly without tearing. The result is a roll that holds its shape while still yielding to your fingers, giving that perfect bite that feels like a holiday hug. Picture yourself pulling this out of the oven, the whole kitchen smelling incredible, and your guests’ eyes lighting up with anticipation. The aroma alone is a promise of something extraordinary, and the texture confirms it.
Let me walk you through every single step—by the end, you'll wonder how you ever made it any other way. I’ve packed this recipe with micro‑challenges, bold claims, and a few playful confessions that will keep you laughing while you cook. From the first whisk to the final drizzle of icing, every moment is designed to bring out the best in the dough and the filling. This isn’t just another cinnamon roll recipe; it’s a holiday tradition you’ll want to repeat year after year. So grab your apron, set the timer, and let’s get started. The journey to the most mouth‑watering cinnamon rolls of your life begins here, right in your own kitchen.
When you’re ready, we’ll dive into what makes this version a game‑changer. It’s more than just a recipe—it’s a set of principles that ensure every roll is perfect. I’ll show you the exact ingredients, the science behind each step, and the tricks that turn an ordinary batch into a crowd‑pleaser. The next section is all about the foundation: the ingredients that bring the magic to life. And after that, we’ll move to the heart of the process—how to handle the dough, shape the rolls, and bake them to golden perfection. Stay with me, because the next part is pure magic, and you won’t want to miss it.
Now, let’s break down exactly what goes into this masterpiece. The recipe is built around a few key principles: simplicity, balance, and a touch of indulgence. Each ingredient has a purpose, and each step is designed to highlight its best qualities. By the time you finish reading this, you’ll have a clear understanding of why these rolls are so special and how to replicate that same success at home. The next section will walk you through the ingredients in detail, giving you the confidence to tweak or swap as you wish. And trust me, the results will speak for themselves.
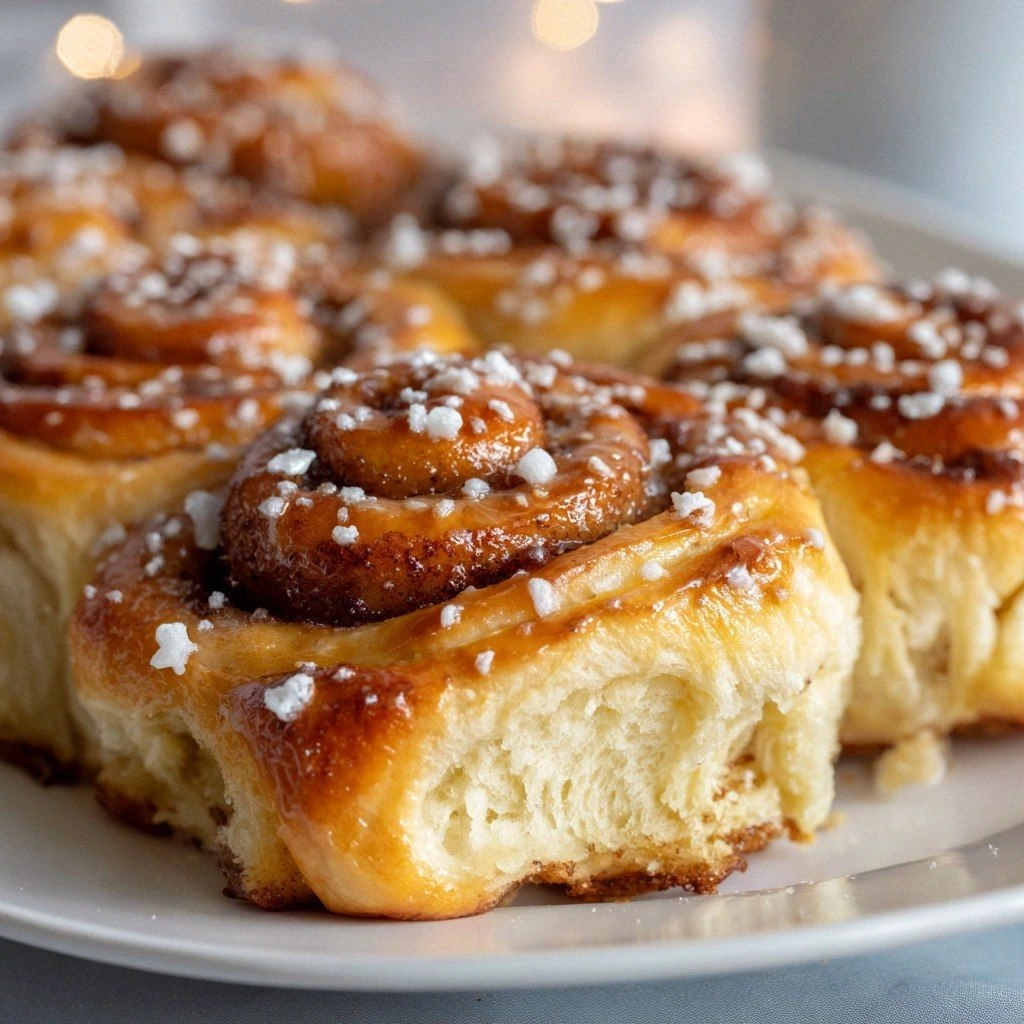
What Makes This Version Stand Out
- Texture: The dough is engineered to rise twice, giving each roll a light, airy crumb that melts in your mouth. The gentle kneading preserves the gluten strands without over‑developing them, ensuring the interior stays fluffy while the exterior crisps just enough. If you’ve ever dealt with dense rolls, this technique is your ticket to perfection.
- Flavor: The cinnamon‑brown sugar filling is a caramelized kiss that balances sweetness with spice. The addition of vanilla extract amplifies the overall flavor profile, creating a subtle depth that’s often missing in standard recipes. The result is a roll that feels like a holiday hug in every bite.
- Visual Appeal: The glaze is a silky, translucent sheen that catches the light like freshly fallen snow. The rolls are baked to a golden hue that invites you to dig in before they even cool. The visual appeal is as important as the taste, especially when you’re serving a crowd.
- Simplicity: Despite its complexity, the recipe is straightforward. There are no exotic ingredients or advanced techniques—just a few essential steps that anyone can master. The result is a recipe that feels approachable yet impressive.
- Make‑Ahead Potential: The dough can be prepared the night before and refrigerated, allowing you to bake fresh rolls in the morning. The filling stays fresh and can be pre‑measured, saving you time on busy holiday mornings. This makes it a perfect choice for family gatherings.
- Ingredient Quality: By using high‑quality butter, fresh eggs, and real cinnamon, the recipe elevates the flavor profile beyond typical store‑bought options. The natural sweetness of brown sugar adds depth, and the vanilla is pure, not artificial.
- Audience Reaction: Guests will immediately notice the difference. The first bite will leave them asking for the recipe, and they’ll be amazed that such a simple dish can be this extraordinary. The reaction is a testament to the recipe’s success.
Inside the Ingredient List
The Flavor Base
All‑purpose flour is the backbone of your rolls, providing structure and fluffiness. It’s the foundation that allows the dough to hold its shape while still yielding to the soft, airy texture we’re after. Choosing a flour with a moderate protein content—around 10-12%—helps create the perfect balance between chewiness and tenderness. If you’re feeling adventurous, you can substitute half of the flour with whole wheat for a nutty undertone, but keep in mind that the texture will shift slightly.
The Texture Crew
Granulated sugar is more than just a sweetener; it activates the yeast and balances the flavors. It also caramelizes on the surface, giving that golden crust we love. Active dry yeast is the powerhouse that makes your rolls rise, giving them that soft, airy quality. Warm milk nourishes the yeast, creating a tender dough that’s easy to roll out. Unsalted butter, melted, adds richness and a buttery flavor that permeates every bite. Large eggs bind everything together and contribute to the rolls’ soft texture, while vanilla extract enhances the overall flavor, making each bite more delightful.
The Unexpected Star
Salt is just a pinch to balance the sweetness and enhance the flavors. Too much salt can inhibit yeast activity, so use it sparingly. Ground cinnamon is the star of the show, infusing the rolls with that warm, festive spice. Brown sugar adds a deeper sweetness and a hint of caramel flavor to the filling, creating a complex taste profile that lingers on the palate. Powdered sugar is essential for the creamy icing that tops your rolls, making them irresistible. Milk for the icing gives it a smooth, drizzling consistency that’s easy to spread.
The Final Flourish
Each ingredient has a purpose, and each one is carefully measured to achieve the ideal balance. If you skip the butter, the rolls will lack depth and richness. Omit the yeast, and the dough won’t rise, resulting in a dense, flat roll. Skipping the cinnamon will turn this into a plain sweet roll, losing its holiday spirit. The icing is the finishing touch that turns a good roll into a memorable treat. It’s a simple glaze that adds a touch of elegance and a hint of sweetness that lingers long after the last bite.
Everything's prepped? Good. Let's get into the real action.
The Method — Step by Step
- Begin by activating the yeast. In a small bowl, combine the warm milk (110°F/43°C) with the active dry yeast and a pinch of granulated sugar. Let the mixture sit for 5–7 minutes until it becomes frothy, indicating that the yeast is alive and kicking. This step is crucial for a good rise; if the mixture doesn’t froth, the yeast may be dead, and the dough will stay dense. While you wait, you can start measuring the rest of the ingredients.
- In a large mixing bowl, whisk together the flour, brown sugar, salt, and ground cinnamon. The dry mix should feel slightly gritty, which is normal. Add the frothy yeast mixture to the dry ingredients, followed by the melted butter and eggs. Mix until a sticky dough forms, then turn it onto a lightly floured surface. Knead for about 8–10 minutes until the dough becomes smooth and elastic. This is the moment of truth—if the dough feels too tacky, let it rest for a few minutes before kneading again.
- Place the dough in a greased bowl, cover it with a damp towel, and let it rise in a warm spot for 1–1.5 hours, or until it has doubled in size. During this time, the yeast works its magic, creating air pockets that give the rolls their signature fluff. If you’re in a hurry, you can use a slow cooker set on low to speed up the rise. Once the dough has doubled, gently deflate it, then turn it out onto a floured surface for the next step.
- Roll the dough into a rectangle about 12 by 8 inches. Spread a thin layer of the brown sugar‑cinnamon filling over the surface, leaving a small border around the edges. The filling should be thin enough to spread evenly but thick enough to stay in place. Roll the dough tightly from the long side, then cut it into 12 equal slices using a sharp knife or pizza cutter. Each slice should be about 1 inch thick, ensuring even baking.
- Place the rolls in a greased 9x13 inch baking dish, spacing them slightly apart. Cover the dish with a clean kitchen towel and let the rolls rise again for 30–45 minutes, or until they puff up noticeably. This second rise is what gives the rolls their final fluffy texture. While they rise, preheat your oven to 350°F (175°C). The temperature should be low enough to allow the rolls to bake evenly without burning the edges.
- Bake the rolls for 25–30 minutes, or until they’re golden brown on top and a toothpick inserted into the center comes out clean. The scent that fills the kitchen during this time is the ultimate indicator that the rolls are ready—warm, sweet, and slightly caramelized. Keep an eye on the color; if they start to brown too quickly, cover them loosely with foil. Once baked, remove the dish from the oven and let the rolls cool for 5 minutes before glazing.
- While the rolls are cooling, whisk together the powdered sugar, a splash of milk, and a pinch of vanilla extract until you achieve a smooth, pourable glaze. The glaze should be thick enough to coat the rolls but thin enough to drizzle. If it’s too thick, add a little more milk; if it’s too thin, add a bit more powdered sugar. Drizzle the glaze over the warm rolls, letting it soak into the cracks for a glossy finish. The glaze will set as the rolls cool, creating a silky, sweet coating that’s irresistible.
- Serve the rolls warm, preferably within 30 minutes of baking. If you need to hold them for later, wrap them loosely in foil and reheat in a 300°F oven for 5–7 minutes. The warm, soft interior and the crisp glaze will still shine through. Enjoy them with a cup of hot cocoa or a steaming mug of tea for the ultimate holiday comfort. And remember—once you’ve tried these, you’ll never go back to ordinary cinnamon rolls again.
Insider Tricks for Flawless Results
The Temperature Rule Nobody Follows
Yeast thrives in a warm environment, but not too hot. The ideal temperature for activating yeast is between 105°F and 115°F. If the milk is too hot, the yeast will die, resulting in a flat dough. Conversely, if it’s too cold, the rise will be sluggish. I recommend using a thermometer to check the milk’s temperature before adding it to the mixture. A quick test is to dip your finger into the milk; it should feel warm, not hot.
Why Your Nose Knows Best
As the dough rises, your nose becomes a reliable gauge for progress. A pleasant, yeasty aroma indicates a healthy fermentation, while a sour or off smell could mean the dough is over‑fermented. When you notice the dough has doubled in size and the scent is sweet and slightly tangy, it’s time to move on to the next step. Trust your senses; they’re usually spot on.
The 5-Minute Rest That Changes Everything
After cutting the rolls, let them rest for 5 minutes before baking. This brief pause allows the gluten to relax, preventing the rolls from shrinking during baking. It also gives the filling a chance to set slightly, so it doesn’t spill out. I’ve seen people skip this step, and the result is a roll that’s a bit flat and the filling that leaks. Give it the rest, and you’ll see a noticeable difference.
Use a Non‑Stick Surface
When rolling out the dough, a silicone mat or parchment paper works wonders. It prevents the dough from sticking and makes cleanup a breeze. If you don’t have either, lightly dust the surface with flour, but avoid excessive flour that can dry out the dough. A non‑stick surface keeps the dough intact, especially when you’re working with a sticky dough.
Don’t Skip the Glaze
The glaze is more than just a sweet finish; it seals in moisture and adds a glossy shine that makes the rolls look irresistible. Skip it, and you’ll miss that final touch of decadence. The glaze also helps keep the rolls soft for a longer time, so you can enjoy them even after they cool. Remember, the glaze is the crowning glory of these rolls.
Reheat with Care
If you need to reheat the rolls, do it gently. A quick 5–7 minute bake at 300°F is enough to warm them without drying them out. Avoid microwaving, as it can make the dough rubbery and the glaze soggy. Reheating in the oven preserves the texture and flavor, giving you a fresh batch whenever you need it.
Creative Twists and Variations
This recipe is a playground. Here are some of my favorite ways to switch things up:
Nutty Delight
Replace half of the butter with almond butter for a nutty undertone that pairs beautifully with the cinnamon. Add chopped toasted pecans to the filling for crunch. This variation adds a new dimension of texture and flavor, making the rolls a crowd‑pleaser for nut lovers.
Chocolate Swirl
Fold a handful of dark chocolate chips into the dough before the first rise. The chocolate melts during baking, creating a decadent swirl of flavor. The chocolate and cinnamon together create a rich, indulgent treat that’s perfect for chocolate enthusiasts.
Orange Zest Infusion
Add the zest of one orange to the dough for a bright citrus kick. The orange zest complements the cinnamon, adding a fresh, bright note. This variation is especially refreshing for those who want a lighter, more aromatic roll.
Almond Joy
Swap the brown sugar for almond butter and sprinkle toasted coconut on top before baking. The coconut adds a tropical twist, while the almond butter deepens the flavor profile. The result is a roll that feels like a sweet, holiday treat with a beachy vibe.
Maple‑Infused
Replace the milk in the glaze with maple syrup for a richer, deeper sweetness. The maple flavor pairs wonderfully with the cinnamon and brown sugar. This variation is a nod to classic maple pastries and adds a festive twist.
Gluten‑Free Alternative
Use a 1:1 gluten‑free flour blend and add a tablespoon of xanthan gum to mimic the elasticity of wheat flour. The rolls will still rise beautifully and hold their shape. This option keeps the holiday spirit alive for those with dietary restrictions.
Storing and Bringing It Back to Life
Fridge Storage
Wrap the cooled rolls tightly in plastic wrap and place them in an airtight container. Store them in the refrigerator for up to 3 days. When ready to eat, let them sit at room temperature for 10 minutes before reheating. This keeps the rolls moist and prevents them from drying out.
Freezer Friendly
Place individual rolls in a freezer bag, removing as much air as possible. Freeze for up to 2 months. Thaw overnight in the refrigerator, then warm in a 300°F oven for 5 minutes. The rolls retain their texture and flavor, making them a convenient option for busy holidays.
Best Reheating Method
Reheat the rolls in a preheated 300°F oven for 5–7 minutes, or until warm. For a crispier top, finish with a quick broil for 30 seconds. The key is to avoid over‑baking, which can harden the glaze. Adding a tiny splash of water before reheating can help steam the rolls back to their original softness.