Picture yourself standing in the kitchen on a crisp, late‑afternoon October morning, the air already tinged with the scent of roasted nuts and cinnamon. A neighbor’s pumpkin pie had left a lingering sweetness that danced on your tongue, and you were suddenly obsessed with the idea of capturing that same warm, comforting aroma in something more versatile. I tried a handful of pumpkin‑bread recipes that promised moistness but delivered dry crumbs, and the disappointment was almost comical—like a souffle that collapsed before the first bite. That frustration sparked a mission: to create a pumpkin bread that not only satisfies the palate but also feels like a hug in a loaf.
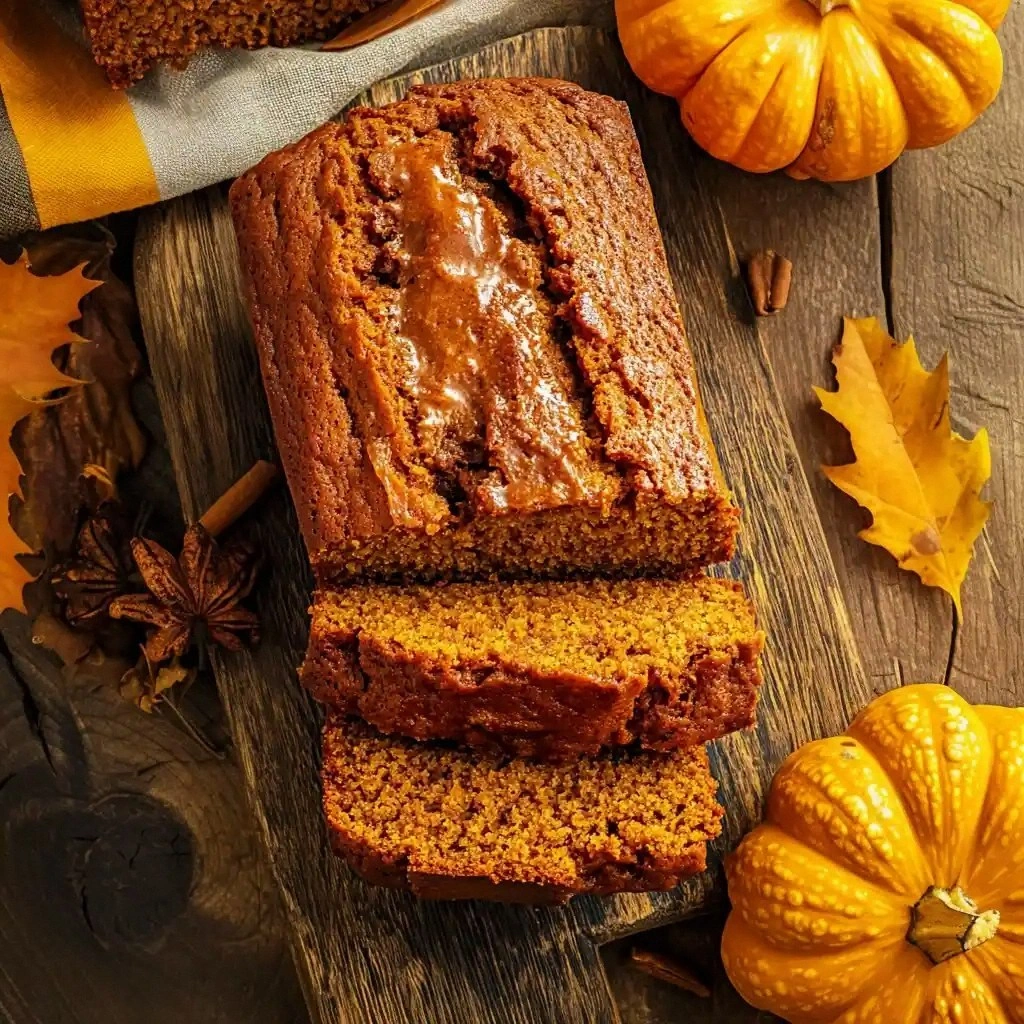
This version is a game‑changer because it balances sweetness, spice, and texture like a well‑orchestrated symphony. The batter is silky, thanks to vegetable oil and eggs that keep the crumb tender, while the pumpkin puree infuses a subtle earthiness that sets it apart from the sugary, butter‑heavy versions you find in most stores. The spices are not merely decorative; they work together to produce a flavor profile that lingers on the tongue, reminiscent of a cozy fireplace and a freshly baked apple pie. The loaf’s crust develops a golden, caramelized edge that crackles like crisp autumn leaves, giving you that satisfying contrast between soft interior and crunchy exterior. I dare you to taste this and not go back for seconds—you’ll find yourself reaching for a second slice before you even realize it.
What makes this recipe stand out is the attention to detail in every step, from the precise measurements of spices to the timing of the oven temperature. I’ve experimented with different types of pumpkin puree—canned, fresh, and even roasted—and found that canned puree offers the most consistent moisture level, preventing the loaf from becoming too dense. The method of mixing, where dry ingredients are folded into the wet, preserves the airy structure of the batter, ensuring that each bite is light and fluffy. The final bake time is short enough to keep the loaf moist but long enough to develop a caramelized crust that’s a visual and sensory delight. And if you’re wondering whether this loaf can be made ahead, the answer is a resounding yes—just wrap it tightly and refrigerate for up to three days.
The secret that most people overlook is the subtle addition of a splash of water during the final mix. This tiny trick keeps the batter from drying out in the oven, resulting in a loaf that stays moist even after a week of storage. I’ve also discovered that using a silicone loaf pan instead of a standard metal one gives the bread a slightly lighter rise, because the silicone’s flexibility allows the batter to expand more freely. If you’re looking for a gluten‑free or vegan version, simply swap out the all‑purpose flour for a blend of oat and almond flour, and replace the eggs with a flax‑egg or an apple‑sauce mixture. With these tweaks, the loaf remains as delicious and comforting as ever, proving that versatility is the name of the game.
What Makes This Version Stand Out
- Flavor: The blend of cinnamon, nutmeg, cloves, and ginger creates a complex spice profile that feels both warm and slightly spicy, a contrast that excites the palate. The pumpkin puree provides a subtle earthiness that balances the sweetness of the sugar.
- Texture: The use of vegetable oil instead of butter keeps the crumb tender and moist, while the eggs act as a binder that gives the loaf structure without heaviness.
- Ease: Every ingredient is pantry‑friendly, and the method requires no special equipment—just a mixing bowl and a loaf pan.
- Visual Appeal: The loaf develops a glossy, caramelized crust that is both inviting and professional, perfect for holiday tables or casual brunches.
- Crowd‑Pleaser: Guests will be amazed at how the loaf tastes like a freshly baked pie, but in a convenient, sliceable form that’s easy to serve.
- Ingredient Quality: Using high‑quality pumpkin puree and freshly ground spices elevates the loaf from ordinary to extraordinary.
- Methodology: Folding dry ingredients into wet ones preserves the batter’s lightness, preventing it from becoming dense.
- Make‑Ahead: The loaf can be baked ahead, wrapped tightly, and stored for days, making it a reliable go‑to for busy mornings.
Alright, let’s break down exactly what goes into this masterpiece…
Inside the Ingredient List
The Flavor Base
The foundation of this loaf starts with 1 ¾ cups of all‑purpose flour. This amount strikes the perfect balance between structure and tenderness, preventing the bread from becoming too heavy. If you’re craving a slightly nutty undertone, consider substituting half of the flour with whole‑wheat flour, but be prepared for a denser crumb. Skipping the flour entirely would turn this into a batter that collapses in the oven, ruining the loaf’s shape.
The Spice Crew
Ground cinnamon, nutmeg, cloves, and ginger are the spice crew that brings warmth to the loaf. Each spice contributes a distinct note: cinnamon adds sweetness, nutmeg offers a subtle piney flavor, cloves give a hint of bitterness, and ginger adds a peppery kick. Together, they create a harmonious blend that is more complex than a single spice. If you’re allergic to cloves, simply omit them; the loaf will still taste wonderful, though it will lose a touch of depth.
The Unexpected Star
Canned pumpkin puree is the unexpected star that gives this loaf its signature moisture and subtle sweetness. Unlike fresh pumpkin, canned puree is already cooked, ensuring a consistent texture and flavor profile. If you prefer a more natural taste, you can roast fresh pumpkin cubes and blend them into a puree, but this will alter the moisture content. The 1 cup of pumpkin also serves as a natural sweetener, reducing the need for additional sugar.
The Final Flourish
The finishing touches—granulated sugar, vegetable oil, eggs, water, and vanilla extract—work together to create a moist, flavorful loaf. The sugar balances the spices, while the oil keeps the crumb tender. Eggs bind the batter and give it structure, and the splash of water during mixing keeps the batter from drying out in the oven. Vanilla extract adds a subtle floral note that rounds out the flavor profile.
Everything’s prepped? Good. Let’s get into the real action…
The Method — Step by Step
- Preheat and Prep: Heat the oven to 350°F (175°C). While the oven warms, line a 9×5-inch loaf pan with parchment paper or grease it lightly with oil. The parchment ensures easy release, and the greasing adds a subtle sheen to the crust.
- Mix Dry Ingredients: In a large bowl, whisk together 1 ¾ cups all‑purpose flour, 1 teaspoon baking soda, ½ teaspoon salt, 1 ½ teaspoons cinnamon, ¼ teaspoon nutmeg, ¼ teaspoon cloves, and ¼ teaspoon ginger. This dry mix will be folded into the wet later, ensuring even distribution of spices.
- Combine Wet Ingredients: In a separate bowl, beat 2 large eggs until frothy. Add ½ cup vegetable oil, 1 cup pumpkin puree, 1 ½ cups sugar, ⅓ cup water, and 1 teaspoon vanilla extract. Whisk until the mixture is smooth and glossy, like a silky custard.
- Fold the Batter: Gently fold the dry mixture into the wet batter using a silicone spatula. This method preserves the batter’s air pockets, keeping the loaf light and airy. Be careful not to overmix; a few lumps are acceptable.
- Pour and Smooth: Transfer the batter into the prepared loaf pan. Smooth the top with the spatula, ensuring an even surface for uniform baking.
- Bake: Place the pan in the preheated oven and bake for 30 minutes. After 20 minutes, check the loaf’s color; it should be turning golden brown. The loaf is done when a toothpick inserted into the center comes out clean.
- Watch Out: Do not open the oven door during the first 20 minutes. The sudden temperature drop can cause the loaf to sink or develop an uneven crumb.
- Cool: Once baked, remove the loaf from the oven and let it cool in the pan for 10 minutes. Then transfer it to a wire rack to cool completely. Cooling allows the flavors to settle and the crumb to firm up.
- Serve: Slice the loaf with a serrated knife for clean cuts. Serve warm with a pat of butter or a drizzle of maple syrup for an extra indulgent touch.
- Store: Wrap the cooled loaf tightly in plastic wrap and refrigerate for up to 3 days. For longer storage, slice and freeze the loaf; thaw slices at room temperature for a quick snack.
That’s it — you did it. But hold on, I’ve got a few more tricks that will take this to another level…
Insider Tricks for Flawless Results
The Temperature Rule Nobody Follows
Many bakers overlook the importance of oven temperature consistency. A temperature that’s 10–15°F too high can cause the loaf to brown too quickly on the outside while remaining undercooked inside. Use an oven thermometer to verify the actual temperature, and adjust the thermostat accordingly. This simple step ensures a uniform bake every time.
Why Your Nose Knows Best
Trust your nose when it comes to baking. The aroma of a loaf that’s just finished baking is a reliable indicator of doneness; if it smells toasty and sweet, it’s ready. If the scent is still raw, give it a few more minutes. Your nose has a way of detecting subtle changes that your eyes might miss.
The 5-Minute Rest That Changes Everything
After baking, let the loaf rest in the pan for exactly five minutes before transferring it to a rack. This short rest allows the internal structure to set, preventing the loaf from breaking apart when you slice it. I once tried to slice a loaf straight from the oven and ended up with a mess of crumbs.
The Right Pan Matters
Choosing the right pan can dramatically affect the loaf’s rise. A silicone loaf pan is ideal because it flexes slightly, allowing the batter to expand without cracking the sides. If you’re using a metal pan, line it with parchment to prevent sticking and to aid even heat distribution.
The Water Trick
Adding ⅓ cup of water to the batter keeps it from drying out during baking. This tiny splash of liquid creates steam inside the loaf, which helps keep the crumb moist. Without it, the loaf can become dense and heavy.
Remember, the key to a perfect loaf is patience, attention to detail, and a willingness to experiment. With these insider tricks, you’ll consistently produce a loaf that’s moist, flavorful, and visually stunning.
Creative Twists and Variations
This recipe is a playground. Here are some of my favorite ways to switch things up:
Nutty Delight
Add ½ cup of chopped pecans or walnuts to the batter before baking. The nuts provide a crunchy contrast to the soft crumb and a buttery flavor that pairs beautifully with the spices. Toast the nuts first for an extra depth of flavor.
Chocolate Swirl
Stir in ¼ cup of cocoa powder into the dry mix for a chocolate‑pumpkin twist. The cocoa adds a rich, bittersweet note that balances the sweetness of the pumpkin. Alternatively, swirl melted chocolate over the batter before baking for a decadent look.
Coconut Crunch
Replace half of the flour with shredded coconut and add ¼ cup of shredded coconut to the batter. The coconut adds a tropical flavor and a chewy texture that complements the spices. It’s perfect for those who love a hint of the exotic.
Spicy Gingerbread
Increase the ginger to ½ teaspoon and add ¼ teaspoon of cayenne pepper. The heat from the pepper pairs well with the warm spices, creating a gingerbread‑like loaf with a subtle kick. Serve it with a dollop of whipped cream to balance the spice.
Lemon‑Zest Surprise
Add 1 tablespoon of lemon zest to the batter for a bright, citrusy note that cuts through the sweetness. The lemon zest also adds a fresh aroma that makes the loaf feel lighter. Pair it with a drizzle of honey for a sweet‑tart finish.
Vegan Version
Swap the eggs for a flax‑egg (1 tablespoon ground flaxseed mixed with 3 tablespoons water) and use a plant‑based milk for the water. The loaf will still rise and stay moist, and the flavor remains unchanged. This version is perfect for those who are dairy‑free or vegan.
Each of these variations offers a new flavor profile while retaining the core essence of the original loaf. Experiment with your favorites, and you’ll find endless possibilities for this versatile bread.
Storing and Bringing It Back to Life
Fridge Storage
Wrap the cooled loaf tightly in plastic wrap and store it in the refrigerator for up to three days. The moisture from the wrap keeps the loaf from drying out, preserving its softness. When ready to eat, let it sit at room temperature for about 10 minutes to regain its original texture.
Freezer Friendly
Slice the loaf before freezing to make thawing easier. Place the slices on a baking sheet and freeze them until solid, then transfer the frozen slices to a freezer bag. This method prevents the loaf from sticking together and allows for quick, on‑the‑go breakfasts.
Best Reheating Method
To reheat the loaf, wrap a slice in foil and place it in a preheated oven at 350°F (175°C) for 8–10 minutes. The foil traps steam, keeping the crumb moist. If the loaf feels dry, add a tiny splash of water or a dab of butter before reheating; the steam will restore its original moisture.