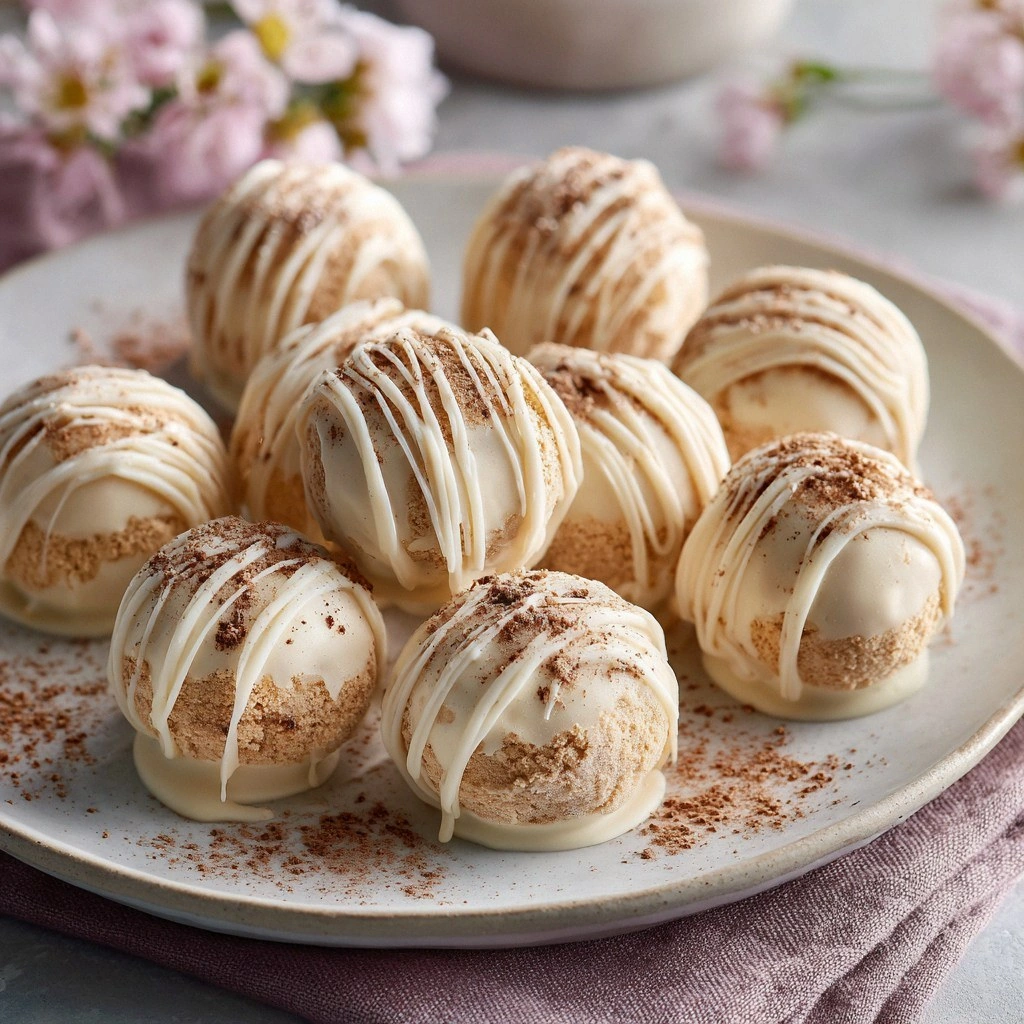
Picture this: I’m standing in a cramped apartment kitchen, a stack of burnt lasagna on the counter, and my friend’s birthday coming up in two days. I’m desperate for something that screams “celebration” but won’t make me feel like I’ve just run a marathon. The solution? Pastel Tiramisu Bites – a no‑bake, bite‑sized marvel that feels like a cloud of espresso‑kissed whipped cream on a chocolate‑dusted runway. I dared myself to make them, and the result was a flavor explosion that left my taste buds dancing, my friends begging for seconds, and me feeling like a culinary wizard.
When you first open the jar, the aroma is an instant trip to a Parisian café: rich espresso, buttery mascarpone, and a faint, sweet whisper of cocoa. The first bite is a silky, airy bite that melts in your mouth, releasing a cascade of espresso and cream that lingers like a secret. The crunch of the ladyfingers gives a satisfying contrast, while the dusting of cocoa feels like a gentle snowfall. The visual appeal is a pastel swirl of ivory and chocolate that makes every bite Instagram‑worthy.
What makes this version stand out is that it’s a *no‑bake* recipe that still delivers the depth of a classic tiramisu, but in a fraction of the time. I’ve tweaked the ratios to create a lighter, fluffier texture that doesn’t feel heavy, and I’ve added a splash of coffee liqueur to give it an adult twist. The result is a dessert that’s both sophisticated and approachable, perfect for a quick party or a decadent after‑dinner treat. And the best part? It’s so easy that even my kitchen rookie cousin could whip it up in under an hour.
I’ll walk you through every single step, from selecting the best mascarpone to the final dusting of cocoa. By the end, you’ll wonder how you ever made tiramisu in a more complicated way. And trust me, once you taste the first bite, you’ll be tempted to hide the recipe from your friends.
What Makes This Version Stand Out
- Texture: The airy mousse layer feels like a cloud, while the crunchy ladyfingers add a satisfying bite.
- Flavor: Espresso and coffee liqueur give depth, while mascarpone brings silky richness.
- No‑Bake: Saves time and eliminates the need for an oven, making it ideal for quick prep.
- Presentation: Pastel ivory base with a dusting of cocoa creates a visually stunning dessert.
- Make‑Ahead: These bites can be assembled a day ahead and kept chilled.
- Ingredient Quality: Using high‑grade mascarpone and fresh ladyfingers ensures authentic taste.
- Crowd‑Pleaser: The combination of coffee, cream, and chocolate satisfies both sweet and savory cravings.
- Adaptable: Swap in vegan mascarpone or almond milk for a dairy‑free version.
Alright, let’s break down exactly what goes into this masterpiece…
Inside the Ingredient List
The Flavor Base
The heart of any tiramisu is its coffee flavor, and I’ve taken it to the next level by using both instant coffee powder and a splash of coffee liqueur. The instant coffee dissolves quickly into the mascarpone mixture, while the liqueur adds a subtle, warm depth that lingers on the palate. If you’re sensitive to alcohol, simply replace the liqueur with an extra shot of espresso or a tablespoon of strong brewed coffee.
The Texture Crew
The ladyfingers provide that classic crunchy contrast. Crush them into fine crumbs and fold them into the mascarpone cream for a delightful textural harmony. The butter and flour create a light, airy base that holds the mousse together without weighing it down. If you’re aiming for a gluten‑free version, swap the all‑purpose flour for almond flour or a gluten‑free blend.
The Unexpected Star
A dash of vanilla extract is the secret weapon that balances the bitterness of espresso and the sweetness of sugar. It brings the flavors together into a cohesive, velvety finish. In this recipe, I use just one teaspoon to keep the profile clean and not overpowering.
The Final Flourish
The dusting of cocoa powder and a light sprinkling of powdered sugar create a pastel ivory look that’s as pleasing to the eye as it is to the tongue. The cocoa powder is lightly toasted before dusting to bring out its nutty aroma, while the powdered sugar adds a gentle sweetness that rounds out the bitterness of espresso.
Everything’s prepped? Good. Let’s get into the real action…
The Method — Step by Step
- Step 1: Prepare the Base — In a medium bowl, whisk together 1 cup of all‑purpose flour, 1/4 cup unsweetened cocoa powder, 1/2 cup powdered sugar, and 1/4 teaspoon salt until well combined. This dry mix will give the bite a firm yet delicate foundation. Keep it aside for now.
- Step 2: Melt the Butter — Gently melt 1/2 cup of unsalted butter in a saucepan over low heat, stirring until fully liquid. The butter should be warm but not scorching; a quick test: a drop should sizzle softly when it hits the pan. Let it cool slightly before adding to the dry mix.
- Step 3: Combine Wet Ingredients — In a separate bowl, beat 1 egg yolk until pale. Add 1 cup of mascarpone cheese, 1 cup of heavy cream, 1 teaspoon vanilla extract, 1 tablespoon instant coffee powder, and 2 tablespoons coffee liqueur. Whisk until the mixture is smooth and glossy, with no lumps. The coffee liqueur will infuse a subtle warmth; if you prefer a non‑alcoholic version, substitute with extra espresso.
- Step 4: Fold in the Dry — Pour the melted butter into the dry flour mixture, stirring until a thick batter forms. Then fold in the mascarpone cream gently, ensuring no lumps remain. The batter should be creamy but thick enough to hold its shape.
- Step 5: Crush the Ladyfingers — Take 1 cup of crushed ladyfingers and fold them into the batter. The crumbs should be evenly distributed, adding a pleasant crunch without overpowering the mousse.
- Step 6: Portion into Molds — Line a silicone muffin tray with liners. Spoon the batter into each cavity, filling them about 3/4 full. Tap the tray gently on the counter to release any air pockets. This step ensures each bite will be uniform and will hold its shape during chilling.
- Step 7: Chill — Place the tray in the refrigerator for at least 4 hours, preferably overnight. The chilling time allows the flavors to meld and the texture to set into a perfect bite‑size mousse.
- Step 8: Dust and Serve — Before serving, dust each bite with 2 tablespoons powdered sugar and a light sprinkle of toasted cocoa powder. The contrast of sweet powder and bitter cocoa creates a sophisticated finish. Serve immediately or keep chilled until ready to serve.
That’s it — you did it. But hold on, I’ve got a few more tricks that will take this from good to unforgettable.
Insider Tricks for Flawless Results
The Temperature Rule Nobody Follows
Keeping your butter just off the boil is key. If it’s too hot, the mascarpone will curdle; if it’s too cool, the batter won’t bind. Aim for 160°F (70°C) — a quick test: drop a small amount into cold water; if it forms a steady, not instant, bubble, it’s perfect.
Why Your Nose Knows Best
Before you add the espresso powder, give it a sniff. A strong, slightly burnt aroma indicates fresh coffee. If it smells flat, your espresso powder might be past its prime, and the final taste will lack depth.
The 5‑Minute Rest That Changes Everything
After folding in the ladyfingers, let the batter sit for 5 minutes before pouring it into the molds. This brief rest allows the crumbs to absorb moisture, preventing a dry bite and ensuring a cohesive mousse.
The Secret to a Silky Finish
Whisk the heavy cream until it just holds soft peaks. Overwhipped cream can become buttery and heavy. This subtlety keeps the bite light and airy.
The Final Dusting Trick
When dusting cocoa, use a fine sieve to distribute it evenly. A coarse sprinkle will leave clumps that can feel gritty. This small step elevates the presentation and texture.
Creative Twists and Variations
This recipe is a playground. Here are some of my favorite ways to switch things up:
Almond Joy Bite
Swap the ladyfingers for shredded coconut and add a tablespoon of almond extract to the mascarpone mix. Finish with a drizzle of melted dark chocolate. Perfect for coconut lovers.
Berry Burst
Fold in a handful of fresh blueberries into the batter before chilling. Top each bite with a light dusting of powdered sugar and a few fresh berries for a pop of color and tartness.
Salted Caramel Swirl
Swirl in a spoonful of salted caramel sauce into the batter before portioning. The caramel adds a buttery sweetness that contrasts beautifully with the coffee notes.
Vegan Version
Use coconut cream instead of heavy cream and vegan mascarpone. Substitute almond milk for the milk component in the butter melt. The result is a creamy, dairy‑free bite that still delivers the classic flavor.
Minty Mojito Twist
Add a teaspoon of fresh mint zest to the mascarpone mixture and a splash of lime juice. Dust with cocoa powder and a pinch of sea salt for a refreshing, mojito‑inspired bite.
Storing and Bringing It Back to Life
Fridge Storage
Keep the bites in a sealed container in the refrigerator for up to 3 days. The chilled environment preserves the mousse’s airy texture and prevents the cocoa dust from clumping.
Freezer Friendly
Freeze the bites in a single layer on a parchment‑lined tray for 2 hours before transferring to a freezer bag. Store for up to 2 weeks. Thaw in the fridge overnight before serving.
Best Reheating Method
To revive frozen bites, let them sit at room temperature for 20 minutes. Add a tiny splash of water to each bite, cover with plastic wrap, and microwave on low for 15–20 seconds. This steams them back to perfection without drying out the mousse.