Picture this: I was halfway through a frantic dinner prep, juggling sautéed veggies, a pot of simmering sauce, and a half‑finished pie crust when my friend dared me to whip up something that would make the whole kitchen smell like sunshine. I stared at the bowl of lemon zest, the citrusy aroma already promising a burst of brightness. I decided then and there that I would turn that simple zest into a decadent tartlet that would leave everyone begging for seconds. I knew the trick was to balance the tartness with just enough sweetness and a buttery crust that melts in your mouth. I also thought about how to make the filling silky without it curdling like a failed custard. And so, with a mischievous grin, I set out to create the ultimate lemon curd tartlets.
I’ve tried countless lemon desserts over the years—tarts, pies, cakes, even a daring lemon mousse that ended up looking more like a science experiment than a dessert. Every time, the result was either too dry, too sweet, or too acidic, leaving a lingering aftertaste that felt like a bad punchline. That’s why this version stands out: it’s not just another lemon tart; it’s a symphony of flavors where the lemon sings, the butter swells, and the sugar settles into a silky finish. I’m talking about a filling that coats the pastry like velvet, a crust that crunches like the first bite of a fresh apple, and a finish that lingers like a summer breeze. The secret? A splash of cream in the filling, a dash of vanilla for depth, and a meticulous baking rhythm that keeps the curd from turning into a lumpy mess. By the end, you’ll wonder how you ever made it any other way.
Let me walk you through every single step—by the end, you'll wonder how you ever made it any other way. I’ll be honest: I ate half the batch before anyone else got to try it. If you've ever struggled with lemon curd that turns into a thick, lumpy puddle, you're not alone—and I've got the fix. Picture yourself pulling these out of the oven, the whole kitchen smelling incredible, and the first bite sending a wave of sunshine through your palate. I dare you to taste this and not go back for seconds. And trust me, once you taste the first tartlet, you’ll be convinced this is hands down the best version you'll ever make at home.
Okay, ready for the game‑changer? This next part? Pure magic. And now the fun part. Stay with me here—this is worth it. The journey from raw ingredients to a buttery, citrus‑laden masterpiece is as thrilling as it is delicious, and I’ll share every trick, hack, and tip that turns a good recipe into a great one. Let’s dive in.
What Makes This Version Stand Out
- Flavor: The lemon curd is bright enough to lift the palate but balanced by a subtle sweetness that keeps it from being a sour shock.
- Texture: A silky filling that glides over the palate, paired with a crisp crust that shatters like thin ice when you bite.
- Ease: Every step is straightforward, with no secret ingredients or complicated techniques—perfect for both beginners and seasoned bakers.
- Make‑Ahead: The tartlets can be assembled a day ahead and refrigerated, making them a perfect last‑minute dessert for gatherings.
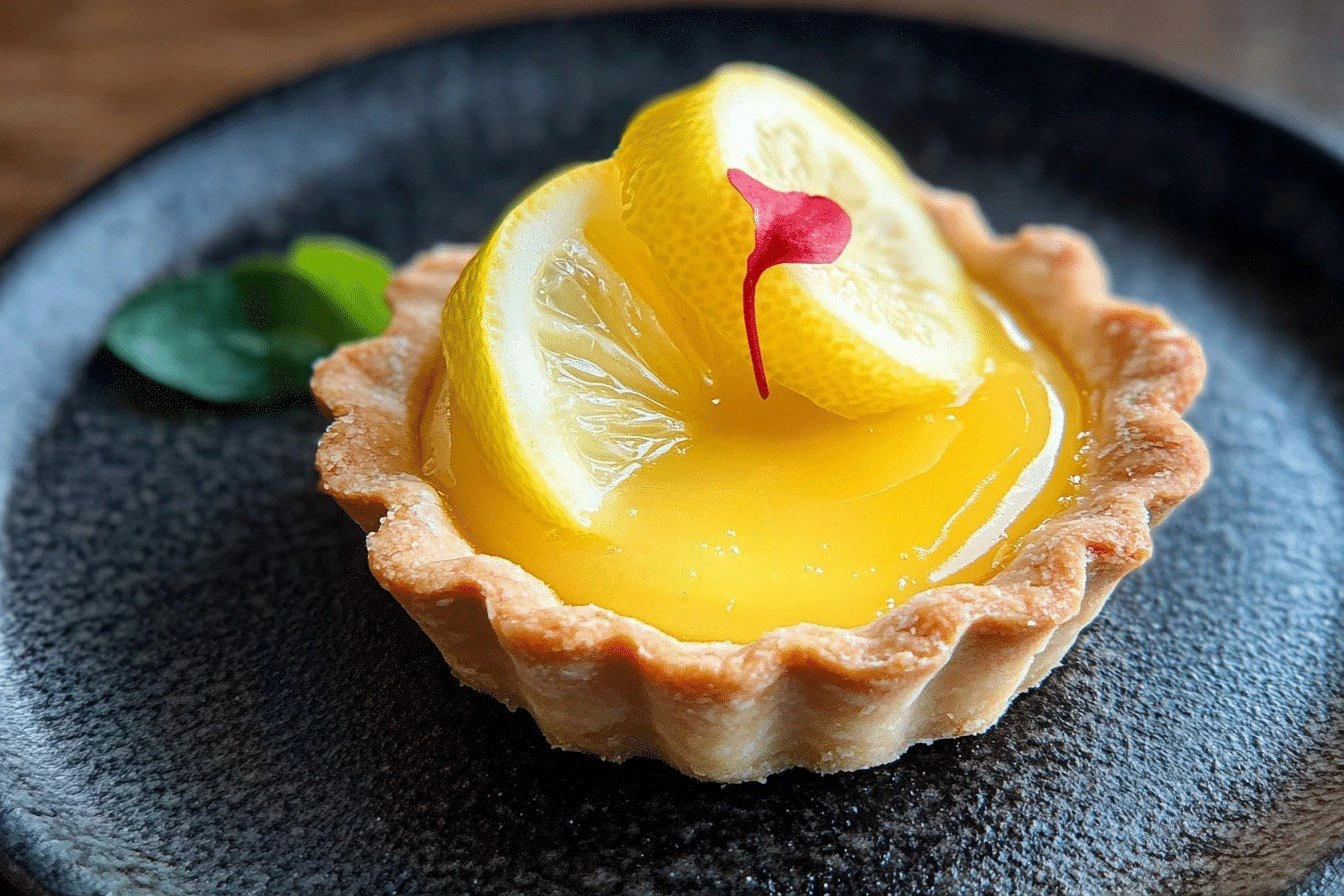
- Visual Appeal: The bright yellow curd contrasts beautifully against the golden crust, making each tartlet a work of art.
- Ingredient Quality: Using fresh lemons, cold butter, and real vanilla extract elevates the flavor profile to something beyond ordinary.
- Crowd Reaction: Friends rave about how the tartlets taste like sunshine in a bite, and they’re always asking for the recipe.
- Versatility: The base can be swapped for a chocolate or berry filling for a seasonal twist.
Inside the Ingredient List
The Flavor Base
The foundation of any great tartlet starts with the crust. Flour provides structure, while butter delivers that rich, melt‑in‑your‑mouth quality. Powdered sugar keeps the crust tender and adds a subtle sweetness that balances the tartness of the filling. Salt is the unsung hero that brings out the depth of flavor in both the crust and the lemon. An egg acts as the binder, giving the dough cohesion and a golden finish. If you skip the egg, the crust will crumble and not set properly, ruining the presentation.
When selecting flour, aim for a medium‑protein all‑purpose variety; it gives the right amount of chew without becoming tough. Butter should be cold and unsalted—cold butter creates steam pockets that puff the crust, while salt in the butter would alter the flavor profile. Powdered sugar is preferred over granulated because it dissolves more easily, preventing gritty crumbs. A pinch of salt is essential; even a small amount elevates the overall taste. An egg, beaten, adds moisture and helps the crust brown beautifully.
If you’re allergic to eggs, try a tablespoon of unsweetened applesauce or a splash of milk as a binder substitute; the crust will still hold together but may not brown as crisply. For a dairy‑free version, use a vegan butter or coconut oil in equal measure. The key is to keep the butter cold throughout the process; this trick keeps the crust flaky and prevents it from becoming soggy.
The Texture Crew
The filling is where the magic happens. Lemon juice provides the bright, tangy punch that defines the dish, while sugar tempers that acidity to create a smooth, sweet balance. Butter in the filling adds richness and a silky mouthfeel, preventing the curd from becoming grainy. Eggs are the emulsifiers that bind everything together into a luscious custard; they also give the filling a glossy finish. Lemon zest adds a burst of citrus oils that give the filling depth and aroma. Vanilla extract brings an underlying warmth, making the lemon taste more complex.
If you forget to whisk the eggs thoroughly, the filling may curdle. For a thicker consistency, reduce the amount of lemon juice slightly or add a teaspoon of cornstarch. A pinch of salt in the filling brings out the lemon’s brightness and balances the sweetness. If you’re looking for a lower‑calorie option, swap out half the butter for Greek yogurt; the yogurt adds creaminess without the fat.
When choosing lemons, look for ones that feel heavy for their size and have a bright, fragrant aroma. Avoid lemons that are too soft or have blemishes. For the best zest, use a microplane to avoid the bitter white pith. The quality of your vanilla extract matters; a high‑quality vanilla bean or 100% vanilla extract will give a richer flavor than a cheap imitation. The filling’s final consistency should be thick enough to hold its shape on the tartlet but still pourable enough to fill the shell evenly.
The Unexpected Star
While the crust and filling are the stars, the subtle addition of a splash of cream in the filling sets this recipe apart. The cream not only softens the acidity but also adds a silky texture that makes the curd feel like a luxurious mousse. Without it, the lemon curd would be more custard‑like and could separate during baking. The cream also helps the filling set more firmly, ensuring the tartlets hold their shape when served.
If you’re dairy‑free, try a tablespoon of coconut milk or almond milk; the result will be slightly different but still delicious. The cream’s role is to balance the lemon’s sharpness, so feel free to experiment with the amount to match your taste. For a lighter version, reduce the cream by half and increase the sugar slightly to compensate for the missing richness. This tweak also makes the tartlets less calorie‑dense while keeping the flavor profile intact.
The Final Flourish
Once the tartlets are baked, a final flourish can elevate them from great to unforgettable. A dusting of powdered sugar creates a subtle sweetness and a visual contrast that makes the tartlets look like polished gems. A drizzle of honey or a thin ribbon of raspberry coulis adds a complementary flavor that pairs wonderfully with lemon. For a festive touch, sprinkle edible gold leaf or candied citrus peel on top.
If you’re presenting these at a brunch, serve them with a dollop of whipped cream or a scoop of vanilla ice cream. The contrast between the warm tartlet and the cold cream creates a delightful temperature play. For a more sophisticated presentation, arrange the tartlets on a slate board with fresh herbs, such as mint or basil, to add a fragrant aroma. Remember, presentation is half the experience—make the tartlets look as good as they taste.
Everything's prepped? Good. Let's get into the real action.
The Method — Step by Step
- Prepare the crust. In a large bowl, whisk together 2 cups of all‑purpose flour, 1/2 cup powdered sugar, and 1/2 teaspoon salt. Add 1 cup of cold, cubed unsalted butter and pulse with a pastry blender or your fingers until the mixture resembles coarse crumbs. Beat 1 large egg and fold it into the dough until it just holds together. Chill the dough for 30 minutes to lock in the butter’s coldness.
- Form the tartlet shells. Divide the chilled dough into 12 equal portions. Roll each portion between two sheets of parchment paper to a thickness of about 1/8 inch. Cut out circles using a 4‑inch cookie cutter, then press each circle into a silicone tartlet mold, pressing the edges firmly. Poke a few holes in the bottom with a fork to prevent bubbling. Chill the molded shells for another 15 minutes.
- Blind bake the shells. Place the chilled shells on the prepared baking sheet. Bake for 10 minutes, then remove the sheet and carefully flip each shell. Bake for an additional 5 minutes until the crust is golden and crisp. Remove from the oven and let them cool on a rack. The shells should be firm enough to hold the filling without cracking.
- Make the lemon curd. In a medium saucepan, whisk together 1 cup freshly squeezed lemon juice, 1/2 cup granulated sugar, and 2 tablespoons lemon zest. Heat over medium heat, stirring constantly until the sugar dissolves and the mixture comes to a gentle simmer. In a separate bowl, whisk 3 large eggs and 4 tablespoons melted butter until smooth. Slowly pour the hot lemon mixture into the egg mixture while whisking vigorously to prevent curdling.
- Finish the curd. Return the saucepan to low heat and stir continuously for 3–4 minutes until the mixture thickens enough to coat the back of a spoon. Remove from heat and stir in 1 teaspoon vanilla extract and a pinch of salt to deepen the flavor. Let the curd cool to room temperature; it will thicken further as it cools.
- Fill the tartlets. Spoon the cooled curd into each pre‑baked shell, filling them almost to the top. The filling should be glossy and smooth, with a slight shine that hints at its freshness. Arrange the filled tartlets on a serving platter and chill for at least 30 minutes to set the filling.
- Decorate and serve. Dust the top of each tartlet with a light dusting of powdered sugar for a polished look. For an extra pop of flavor, drizzle a thin ribbon of honey or a few drops of raspberry coulis around the edges. Serve immediately or keep chilled until ready to serve. The tartlets are best enjoyed within 2 days for peak freshness.
- Enjoy the moment. Take a bite and feel the citrus explode, the buttery crust give way, and the smooth filling melt in your mouth like a summer breeze. The experience is a celebration of flavor, texture, and sheer delight. I dare you to take a second bite and see if you can resist the temptation to go back for more.
That's it — you did it. But hold on, I've got a few more tricks that'll take this to another level. These insider tips will help you avoid common pitfalls, enhance the flavor profile, and ensure every tartlet is a masterpiece.
Insider Tricks for Flawless Results
The Temperature Rule Nobody Follows
Many bakers overlook the importance of oven temperature consistency. A 10‑degree fluctuation can cause the crust to brown unevenly, leading to a burnt edge and a raw center. Use an oven thermometer to confirm the temperature before baking. If your oven runs hot, set it 10 degrees lower and let it preheat for an extra 10 minutes. This small adjustment saves you from a ruined batch and ensures a golden, crisp crust every time.
Why Your Nose Knows Best
As the curd cooks, it releases a sweet, citrus aroma that signals the right thickness. When the mixture starts to thicken, the scent will become more intense and slightly sweet, indicating it's ready. If you’re unsure, dip a spoon into the center; the liquid should coat the back of the spoon without running. Trust your nose and your senses; they’re the best judges of doneness.
The 5‑Minute Rest That Changes Everything
After baking the crusts, let them rest for 5 minutes before flipping. This brief pause allows the steam to settle and prevents the shells from cracking or becoming soggy. A quick rest also gives the crust a chance to firm up, making it easier to handle when filling. Skip this step, and you’ll risk a messy, collapsed tartlet that looks like a sad pancake.
The Perfect Egg Ratio
The ratio of eggs to sugar in the filling determines the custard’s thickness. Too many eggs, and the curd becomes too thick, making it difficult to pour. Too few, and it will set too loosely, causing the tartlets to collapse. The 3‑egg, 1/2‑cup sugar ratio strikes the perfect balance, giving the filling a silky texture that holds its shape.
The Secret of Sweet‑Acid Balance
If you find the curd too tart, add a teaspoon of honey or a tablespoon of maple syrup to mellow the acidity. Conversely, if it’s too sweet, a splash of fresh lemon juice or a pinch of salt can cut through the sweetness and bring the flavor back into equilibrium. This tweak is especially useful when using lemons that are naturally more acidic.
The Final Touch: A Dusting of Powdered Sugar
A light dusting of powdered sugar not only adds a touch of sweetness but also creates a subtle contrast that makes the tartlets visually appealing. Use a fine sieve to ensure an even coating. If you prefer a more decadent look, sprinkle a pinch of edible gold leaf for a glamorous finish. The final touch turns a simple dessert into a showstopper.
Creative Twists and Variations
This recipe is a playground. Here are some of my favorite ways to switch things up:
Berry Burst
Swap the lemon curd for a mixed berry compote made from strawberries, blueberries, and raspberries. Cook the berries with a splash of sugar until they break down into a thick sauce. This variation brings a fruity, slightly tart flavor that pairs beautifully with the buttery crust. Serve with a dollop of whipped cream for a refreshing twist.
Chocolate‑Lemon Fusion
Add a tablespoon of cocoa powder to the filling for a subtle chocolate undertone. The chocolate complements the lemon’s brightness, creating a layered flavor profile that delights the palate. Sprinkle dark chocolate shavings on top for an extra crunch. This version is perfect for chocolate lovers who crave a citrusy surprise.
Mint‑Lemon Refresh
Fold finely chopped fresh mint into the curd for a refreshing herbal note. The mint pairs wonderfully with lemon, giving the tartlets a cooling finish that’s ideal for hot summer days. Garnish with a sprig of mint for an elegant presentation. This variation is a crowd‑pleaser at brunches and potlucks.
Salted Caramel Lemon
Swirl a thin ribbon of salted caramel sauce into the filling just before filling the shells. The caramel adds a rich, buttery sweetness that contrasts with the tart lemon. Sprinkle a pinch of sea salt on top to enhance the caramel’s flavor. This indulgent version is perfect for dessert parties.
Coconut‑Lemon Delight
Replace the butter in the filling with coconut milk for a tropical twist. The coconut adds a subtle sweetness and a silky texture that complements the citrus. Garnish with toasted coconut flakes for added crunch. This version is a great option for those who love a touch of the tropics.
Espresso‑Infused Lemon
Stir in a teaspoon of espresso powder into the curd for a deep, bittersweet flavor. The espresso pairs surprisingly well with lemon, adding depth and complexity. Finish with a dusting of cocoa powder for a sophisticated touch. This variation is ideal for coffee lovers looking for a unique dessert.
Storing and Bringing It Back to Life
Fridge Storage
Store the finished tartlets in an airtight container in the refrigerator for up to 2 days. The crust may soften slightly, so keep the tartlets in a shallow container to maintain the crispness. If you notice the filling has dried out, give it a quick stir before serving.
Freezer Friendly
To freeze, wrap each tartlet individually in plastic wrap and place them in a freezer bag. They will keep for up to 2 weeks. When ready to serve, thaw in the refrigerator overnight and let them sit at room temperature for 15 minutes before serving. The filling will regain its silky texture, and the crust will still be pleasantly crisp.
Best Reheating Method
If you need to reheat, place the tartlets on a baking sheet and warm them in a 300°F (150°C) oven for 5 minutes. For a quick revival, microwave on low power for 10–15 seconds, but be careful not to overheat, or the filling may separate. Adding a tiny splash of water to the filling before reheating creates steam that helps restore its smoothness. Serve immediately for the best experience.