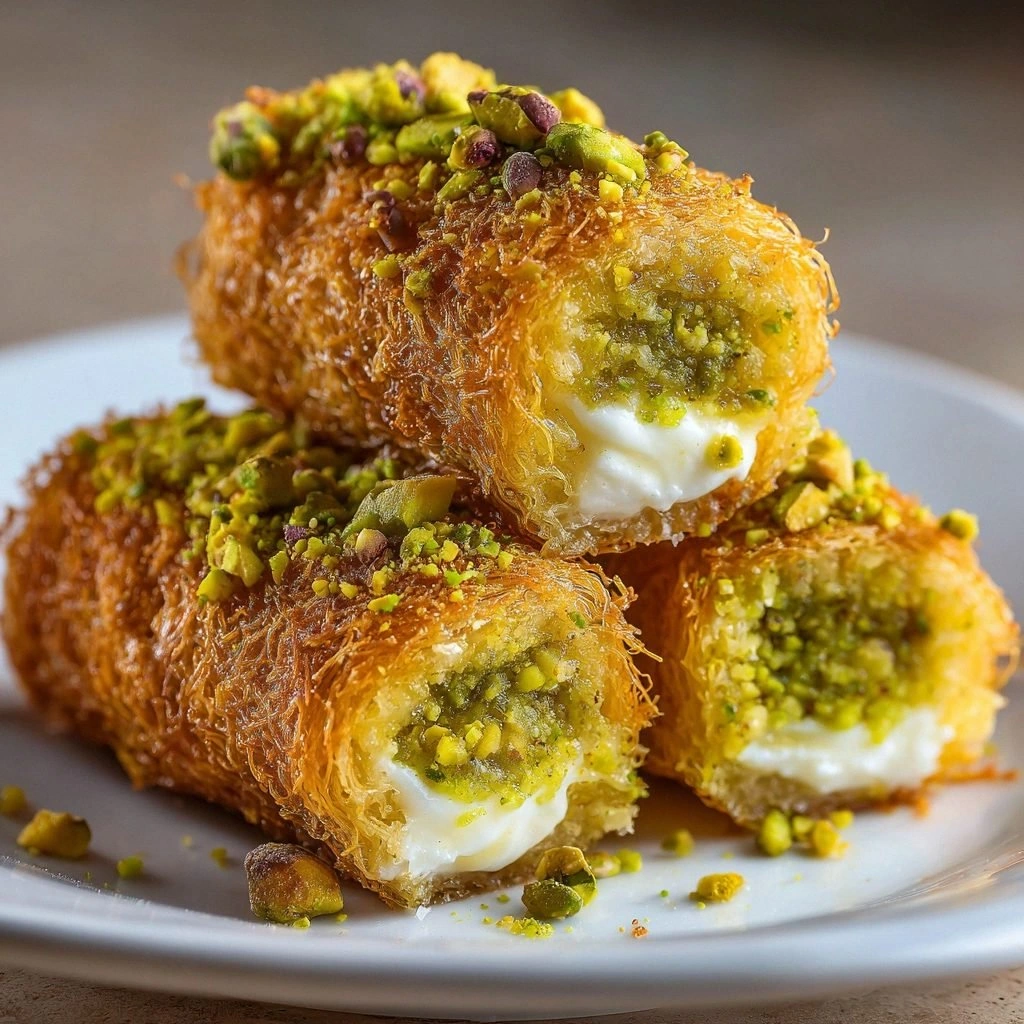
I was standing in my kitchen, surrounded by a mess of flour, sugar, and a half‑baked kataifi that looked like it had just been through a hurricane. The smell of butter and honey hit me like a wave, and I realized I was about to turn a culinary disaster into a sweet triumph. That moment became the spark that ignited this version of Kataifi Rolls with Pistachio—an indulgent, buttery spiral that balances crunchy pistachios with a silky ricotta‑mascarpone filling, all crowned with a honey glaze that sings of caramelized butter.
Picture this: a golden, crisp crust crackling under your knife, the scent of toasted nuts drifting from the oven, and a faint whisper of vanilla that lingers in the air. When you take that first bite, the kataifi gives a satisfying snap, the pistachios burst with a nutty crunch, and the creamy filling melts like silk, leaving a lingering hint of honey that coats your tongue like velvet. The texture contrast is a dance—crispy edges that shatter like thin ice, creamy interior that swirls like a cloud, and a subtle sweetness that doesn’t overpower but rather enhances every component.
What makes this version stand out is not just the combination of flavors, but the meticulous attention to each element: the quality of the kataifi, the freshness of the pistachios, the balance of ricotta and mascarpone, and the finish of honey and vanilla. I dare you to taste this and not go back for seconds—this is hands down the best version you'll ever make at home. It’s the kind of dessert that turns a regular evening into a celebration, and the moment the first roll hits the plate, you’ll know you’ve reached the pinnacle of sweet craftsmanship.
If you've ever struggled with kataifi—those long, thin strands that can be tricky to handle—you're not alone. I’ve spent countless hours learning how to keep them from tearing and how to get that perfect golden crust. I’ll be honest, I ate half the batch before anyone else got to try it. But the secret is simple: treat the pastry like a living thing, keep it moist, and never rush the baking step. Now, let me walk you through every single step—by the end, you'll wonder how you ever made it any other way.
What Makes This Version Stand Out
- Taste: The subtle sweetness of honey pairs flawlessly with the nutty pistachios, creating a layered flavor profile that lingers on the palate.
- Texture: Crispy kataifi strands give way to a silky, creamy center, providing a delightful contrast in every bite.
- Simplicity: Despite its elegant finish, the recipe uses only eight ingredients, making it approachable for both beginners and seasoned bakers.
- Uniqueness: The combination of ricotta and mascarpone elevates the filling to a luxurious, airy consistency that is rarely found in traditional kataifi desserts.
- Crowd Reaction: Guests rave about the unexpected crunch and the honey glaze, often asking for a second plate before the first is finished.
- Ingredient Quality: Using high‑grade pistachios and fresh cheeses makes the difference between good and unforgettable.
- Cooking Method: The technique of rolling the kataifi around the filling before baking locks in moisture and ensures a uniform golden crust.
- Make‑Ahead Potential: The rolls can be assembled ahead of time and baked right before serving, making them perfect for entertaining.
Alright, let's break down exactly what goes into this masterpiece...
Inside the Ingredient List
The Flavor Base
Kataifi Pastry (200 grams) is the star of the dish, providing a crispy texture that contrasts with the creamy filling. Its thin, shredded strands are perfect for absorbing butter and honey, creating a caramelized crust that shatters like thin ice. If you skip the kataifi, you lose the signature crunch and the ability to hold the filling together. For a gluten‑free version, look for a pre‑made gluten‑free kataifi or substitute with shredded phyllo dough.
Pistachios (100 grams, finely chopped) add a nutty flavor and crunch, enhancing the overall taste experience. Freshly toasted pistachios bring a bright, buttery aroma that elevates the rolls to gourmet status. If you’re on a budget, you can use pistachio halves or even chopped walnuts, but the flavor profile will shift slightly. A quick tip: toast the pistachios in a dry skillet for 3–4 minutes until fragrant, then let them cool before chopping.
The Texture Crew
Ricotta Cheese (250 grams) contributes creaminess and a mild flavor, forming the base of the filling. Ricotta’s high moisture content ensures the filling stays luscious without becoming too runny. Skipping ricotta would make the filling dense and less airy, which defeats the purpose of this roll. If you prefer a lighter texture, replace half the ricotta with Greek yogurt, but be sure to strain it to avoid excess liquid.
Mascarpone Cheese (100 grams) adds richness and a smooth texture, elevating the filling’s decadence. Mascarpone’s high fat content gives the filling a luxurious mouthfeel that contrasts beautifully with the crisp kataifi. If you’re looking for a lower‑fat alternative, try using a blend of ricotta and cream cheese, but the flavor will be slightly less indulgent. Keep the mascarpone at room temperature before mixing to ensure a silky blend.
The Sweetener
Powdered Sugar (50 grams) sweetens the filling without adding graininess, ensuring a smooth consistency. Powdered sugar dissolves quickly, preventing any gritty texture in the creamy mixture. If you prefer a natural sweetener, you can replace it with a small amount of honey or maple syrup, but the final sweetness level will differ. Measure the sugar precisely to avoid an overly sweet filling.
Honey (2 tablespoons) is a natural sweetener that enhances the flavor profile and adds moisture. Honey’s floral notes complement the pistachios and add a subtle depth to the glaze. If you’re allergic or dislike honey, you can use agave nectar or a light syrup, but the glaze’s caramelized flavor will change. Warm the honey slightly to make it easier to mix with the butter.
The Finishing Touches
Butter (100 grams, melted) coats the kataifi for a golden finish and adds richness to the rolls. The butter creates a glossy sheen and a slightly caramelized flavor when baked. If you’re avoiding dairy, substitute with clarified butter or a plant‑based butter alternative, but the texture may be slightly different. Keep the butter at room temperature to make it easier to spread.
Vanilla Extract (1 teaspoon) infuses the filling with warmth, balancing the sweetness and adding depth. Vanilla’s aromatic compounds enhance the overall flavor, making the dessert feel more refined. If you’re vegan or prefer a different flavor, try almond extract for a nutty twist, but adjust the amount to avoid overpowering the pistachios.
Everything's prepped? Good. Let's get into the real action...
The Method — Step by Step
- Begin by preheating your oven to 190°C (375°F). While the oven warms, lay the kataifi strands on a parchment‑lined sheet. Gently drizzle melted butter over the strands, ensuring each piece is lightly coated. The butter will help the pastry brown evenly and give it a glossy finish.
- In a mixing bowl, combine the ricotta, mascarpone, powdered sugar, and vanilla extract. Whisk until the mixture is smooth and free of lumps. The goal is a silky filling that will cling to the kataifi without dripping. If the mixture seems too thick, add a splash of milk or cream.
- Fold in the finely chopped pistachios, reserving a handful for topping later. The pistachios should be evenly distributed to give each roll a consistent crunch. A good rule of thumb is to mix until the pistachios are coated with the creamy filling.
- Take a single strand of kataifi and spread a generous amount of the ricotta‑mascarpone mixture along its length. Roll the strand tightly around the filling, tucking the ends under to seal. Repeat this process with each strand until all are rolled.
- Arrange the rolls on a baking sheet, spacing them slightly apart. Drizzle the remaining honey over each roll, allowing it to seep into the folds. The honey glaze will caramelize under the oven heat, giving the rolls a sweet, glossy coat.
- Bake the rolls for 18–20 minutes, or until the kataifi turns a golden brown and the filling is set. The aroma of toasted pastry and honey should fill the kitchen like a warm hug. Keep an eye on the rolls; if they brown too quickly, reduce the temperature slightly.
- Once baked, remove the rolls from the oven and let them cool for 5 minutes on a wire rack. This short cooling period allows the honey glaze to set and the filling to firm up slightly, making slicing easier.
- Before serving, sprinkle the reserved pistachios over the top of each roll. The extra nuts add a final crunch and a burst of color. Optionally, drizzle a thin line of honey over the pistachios for an extra sweet finish.
- Slice the rolls into bite‑size pieces and arrange them on a platter. Serve warm or at room temperature, depending on your preference. The rolls will keep their crispness for a few hours, but for the best experience, enjoy them fresh from the oven.
That's it — you did it. But hold on, I've got a few more tricks that'll take this to another level. If you want to elevate the presentation, consider dusting the rolls with a light sprinkle of powdered sugar or adding a drizzle of dark chocolate for a contrasting flavor profile.
Insider Tricks for Flawless Results
The Temperature Rule Nobody Follows
Many bakers bake kataifi at 200°C, but that temperature can cause the pastry to brown too quickly while the filling remains undercooked. I always set my oven to 190°C (375°F) to allow the pastry to crisp evenly and the filling to set without burning. This simple adjustment saves you from a burnt exterior and a gooey center. If your oven runs hot, consider using a lower temperature and extending the bake time by a couple of minutes.
Why Your Nose Knows Best
Trust your olfactory senses—when the kataifi starts to emit a warm, buttery aroma, you’re halfway there. The smell of toasted nuts and honey is a cue that the glaze is caramelizing properly. If the aroma is faint, the honey may not have baked through, and the rolls could end up dry. Keep a close eye on the scent as you bake; it’s a reliable indicator of success.
The 5-Minute Rest That Changes Everything
After removing the rolls from the oven, let them rest for exactly five minutes. This brief pause allows the honey glaze to set and the filling to firm up, making slicing cleaner and preventing the rolls from falling apart. Many people skip this step and end up with a messy mess. Trust me, the five‑minute rest is the secret to a pristine presentation.
Keep the Kataifi Moist
Kataifi can dry out quickly if left exposed to air. Before baking, lightly mist the pastry with water or a fine spray of melted butter. This keeps the strands supple and prevents them from becoming brittle. If you notice the kataifi is starting to crack, add a few more drops of water and give it a gentle toss to redistribute the moisture.
Use a Baking Sheet with a Cooling Rack
Baking the rolls directly on a flat sheet can cause uneven heat distribution, leading to spots that are overcooked. By placing a cooling rack on top of the sheet, you allow air to circulate around the rolls, ensuring even baking and a crispier crust. This trick is especially useful if you’re baking a large batch.
Creative Twists and Variations
This recipe is a playground. Here are some of my favorite ways to switch things up:
Chocolate‑Covered Kataifi
After baking, drizzle the rolls with melted dark chocolate and let it set. The chocolate adds a rich, bittersweet layer that pairs beautifully with the honey glaze. Sprinkle a pinch of sea salt on top for a salty‑sweet contrast that elevates the flavor profile.
Almond‑Infused Filling
Replace half the pistachios with finely ground almonds and add a splash of almond extract to the filling. The almond flavor offers a subtle nuttiness that complements the ricotta and mascarpone. This version is perfect for those who love a deeper, earthier taste.
Spiced Citrus Variation
Add zest of one lemon or orange to the filling and a pinch of ground cinnamon. The citrus brightens the dessert, while the cinnamon adds warmth. This twist is ideal for spring and summer gatherings, providing a fresh, aromatic experience.
Vegan Kataifi Rolls
Use a plant‑based ricotta alternative, coconut cream, and a vegan butter substitute. Replace honey with maple syrup or agave nectar. The result is a luscious, dairy‑free dessert that still delivers the same indulgent texture.
Mini Kataifi Bites
Cut the filled kataifi strands into 1‑inch segments before baking. These bite‑size treats are perfect for parties or a quick dessert fix. Serve them on a decorative platter with a drizzle of honey for an elegant touch.
Savory Kataifi Rolls
Swap the sweet filling for a savory mixture of feta, herbs, and a splash of olive oil. Add a sprinkle of za'atar on top before baking. The result is a Mediterranean‑inspired snack that’s great for appetizers or a light lunch.
Storing and Bringing It Back to Life
Fridge Storage
Store the cooled rolls in an airtight container in the refrigerator for up to 3 days. The honey glaze helps preserve moisture, but the rolls will soften slightly over time. Before serving, let them sit at room temperature for 10 minutes to restore some of their crispness.
Freezer Friendly
Wrap each roll individually in parchment paper and then place them in a freezer bag. They will keep well for up to 2 months. When ready to serve, thaw at room temperature for 30 minutes, then warm in a 150°C oven for 5 minutes to revive the crisp exterior.
Best Reheating Method
If the rolls have cooled and lost their crunch, a quick 3‑minute reheating in a toaster oven at 180°C will restore the golden crust. Add a splash of water before reheating to create steam, which helps the filling rehydrate without drying out the pastry.