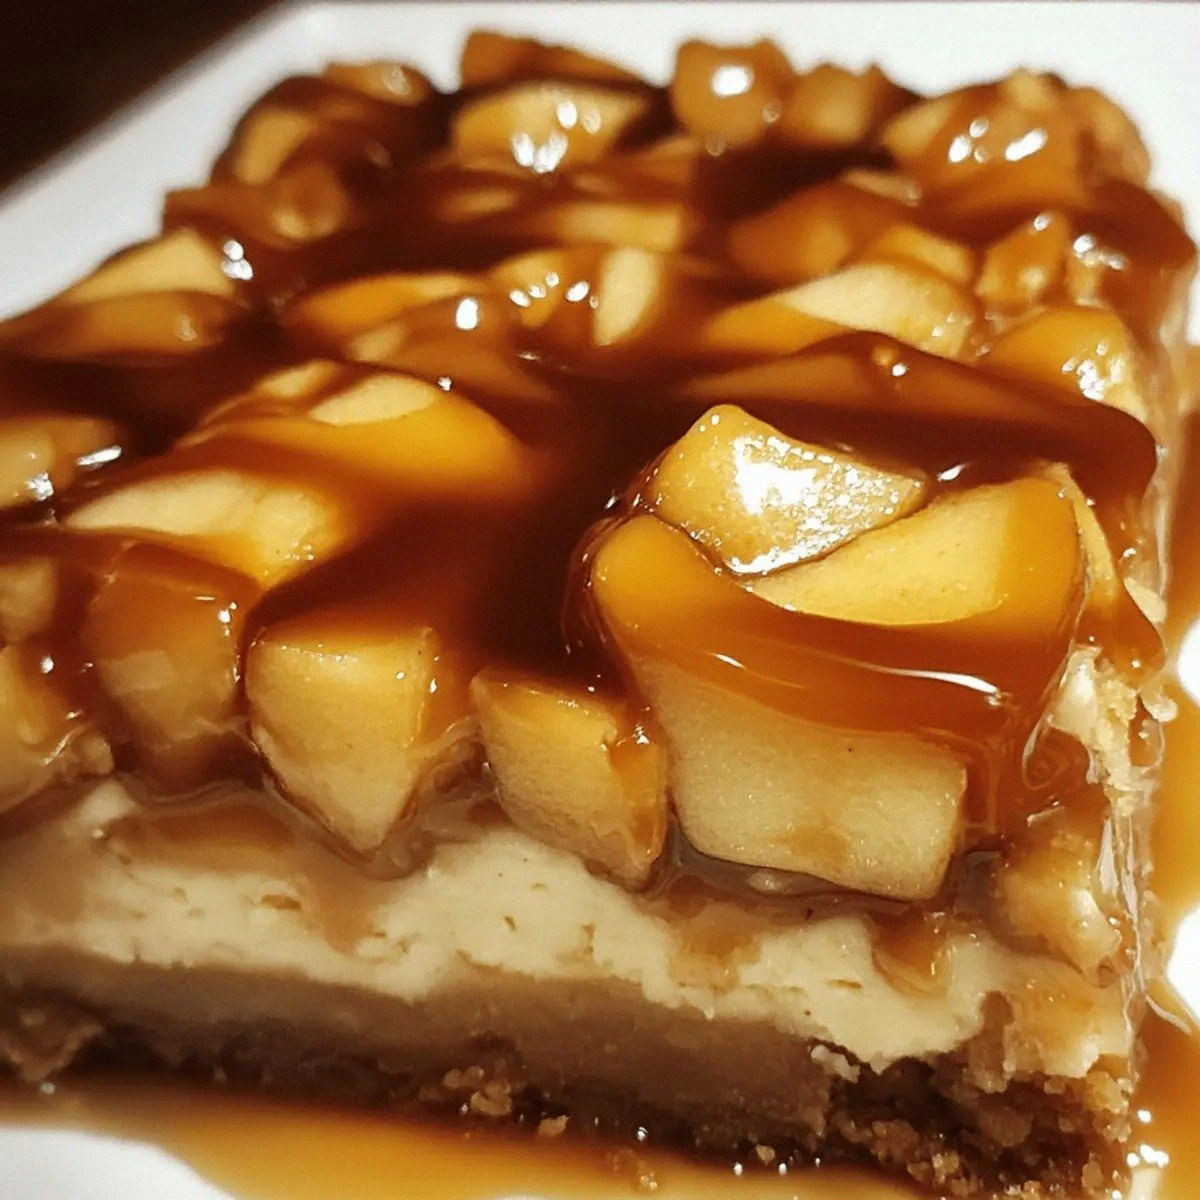
It all started with a kitchen catastrophe that would forever change my dessert game. I was attempting a simple caramel apple cheesecake bar for a last‑minute party, and the caramel sauce decided to behave like a rebellious lava lamp—spilling everywhere, burning the bottom of the pan, and leaving a sticky trail that could have been mistaken for a modern art installation. I stared at the mess, then laughed, because if you can turn a kitchen disaster into a crowd‑pleaser, you’re doing something right. That night, I vowed to refine the recipe until the caramel was silky, the apples crisp, and the crumb base buttery and crunchy.
Picture this: the aroma of toasted graham crackers mingles with the sweet scent of apples roasting in butter, the sound of caramel bubbling like a gentle campfire, and the sight of golden brown crusts glistening under a low oven light. The first bite delivers a crunchy bite, followed by a burst of caramel sweetness that coats the palate like velvet, and the apple’s subtle tartness cuts through the richness, creating a dance of flavors on the tongue. The texture is a delightful contrast—soft, creamy filling juxtaposed with a crisp, buttery base that snaps like a satisfied sigh. I can almost hear the satisfied sighs of guests, the clinking of glasses, and the murmurs of “I need more.”
What makes this version hands down the best you’ll ever make at home is the meticulous balance of every element. The crust isn’t just a base; it’s a caramel‑infused, buttery foundation that anchors the entire bar. The apple filling is thickened with cream cheese, but the secret lies in the double layer of brown sugar that caramelizes to a deep amber hue, giving the dessert a caramelized crunch that feels like a dessert‑level candy. The salted caramel topping isn’t just a drizzle; it’s a glossy, silky sauce that coats the bars like a fine glaze, and the pinch of sea salt is the final flourish that turns sweet into sublime.
I dare you to taste this and not go back for seconds. Most recipes get this completely wrong, but here’s what actually works: the caramel isn’t over‑cooked, the apples retain their bite, and the crumb base stays crisp. The result is a dessert that feels luxurious yet comforting, and it’s perfect for any occasion, from a cozy Sunday afternoon to a holiday gathering.
Picture yourself pulling these out of the oven, the whole kitchen smelling incredible, the bars cooling just enough to be sliced without losing their structure. I’ll be honest—I ate half the batch before anyone else got to try it. Stay with me here—this is worth it. Let me walk you through every single step, and by the end, you’ll wonder how you ever made it any other way.
What Makes This Version Stand Out
- Taste: The caramel is cooked to a perfect amber, avoiding bitterness, while the sea salt lifts the sweetness to a new dimension. Every bite is a harmony of sweet and savory, with the apple’s natural tartness cutting through the richness.
- Texture: The crust is buttery and crisp yet tender enough to bite into, and the filling has a silky, almost custard‑like consistency that melts in your mouth. The caramel topping adds a glossy sheen without becoming too runny.
- Simplicity: Despite the layers, the recipe requires only a handful of pantry staples and a few fresh ingredients. No fancy gadgets, no complicated techniques—just good old‑fashioned baking.
- Uniqueness: The double caramelization of brown sugar creates a depth of flavor rarely seen in standard cheesecake bars. The use of fresh apples gives a fresh, seasonal pop.
- Crowd Reaction: Guests always ask for the recipe after the first bite. The bars are easy to serve, making them ideal for parties and gatherings.
- Ingredient Quality: Using real butter, fresh apples, and cream cheese over powdered alternatives elevates the flavor profile and texture.
- Cooking Method: The oven‑baked caramel layer sets perfectly, preventing the bars from becoming soggy.
- Make‑Ahead Potential: These bars can be made a day ahead and chilled, allowing the flavors to meld beautifully.
Alright, let’s break down exactly what goes into this masterpiece…
Inside the Ingredient List
The Flavor Base
The graham cracker crumbs and butter form the heart of this dessert. The crumbs provide a sweet, crumbly texture that contrasts with the creamy filling, while the butter adds richness and helps bind the base together. If you skip the butter, the crust will be dry and crumbly, lacking the buttery mouthfeel that makes each bite memorable.
The Texture Crew
Cream cheese, sour cream, and eggs work together to create a custard‑like filling that is both firm and smooth. The cream cheese brings tang and body, the sour cream adds moisture and a slight tang, and the eggs act as a binder, ensuring the bars hold together when sliced. Skipping any of these will compromise the filling’s structure and flavor.
The Unexpected Star
Fresh apples are the star that adds a natural sweetness and a pleasant chew. They also release moisture during baking, which helps the caramel sauce set properly. If you use canned apples, the texture will be mushy and the bars may become soggy. For a seasonal twist, try adding a handful of dried cranberries or raisins.
The Final Flourish
The caramel sauce, made from brown sugar, butter, heavy cream, and a pinch of sea salt, is the crowning glory. It coats the bars like a glossy glaze, adding a sweet, buttery finish that balances the tartness of the apples. If you omit the sea salt, the caramel will taste flat and overly sweet.
Everything’s prepped? Good. Let’s get into the real action…
The Method — Step by Step
- Preheat your oven to 325°F (163°C). Line an 8‑by‑8‑inch baking pan with parchment paper, leaving an overhang on all sides for easy removal. In a medium bowl, combine the graham cracker crumbs, 6 Tbsp of unsalted butter, and 3 Tbsp of granulated sugar. Use a fork or your fingers to mix until the crumbs are evenly coated and the mixture resembles coarse sand. Press the crumb mixture firmly into the bottom of the prepared pan, creating an even layer that will serve as the crust. This step is crucial—if the crust is too loose, it will crumble when you cut the bars. Keep the crust in the refrigerator while you prepare the filling.
- Dice the apples into small, bite‑sized pieces. In a medium saucepan, melt 6 Tbsp of butter over medium heat. Add the diced apples and a pinch of nutmeg, and sauté until the apples are just tender, about 5 minutes. Sprinkle in 0.25 cups of brown sugar and 1 tsp of ground cinnamon, stirring until the sugar dissolves and the apples become glossy. Remove the pan from heat and set aside. The apple mixture should smell fragrant and lightly caramelized, but not browned. This caramelization is what gives the bars their signature depth.
- While the apples cool, prepare the cheesecake filling. In a large bowl, beat 16 oz of cream cheese until smooth. Add 0.5 cups of sour cream, 0.5 cups of granulated sugar, and 1 tsp of vanilla extract. Mix until creamy and well combined. Then add 2 large eggs, one at a time, beating well after each addition to avoid curdling. Fold in the cooled apple mixture gently, ensuring even distribution. The filling should be thick yet pourable. This is the moment of truth—if the mixture is too runny, the bars will collapse.
- Pour the filling over the chilled crust, smoothing the top with a spatula. Place the pan in the preheated oven and bake for 30 minutes, or until the edges are set and the center has a slight wobble. The bars should still be a little jiggly in the middle; they’ll firm up as they cool. Keep a close eye on the temperature—overbaking will cause the filling to crack and the caramel to burn.
- While the bars are baking, prepare the salted caramel sauce. In a saucepan, combine 0.5 cups of brown sugar, 2 Tbsp of butter, and 0.25 cups of heavy cream. Cook over medium heat, stirring constantly, until the mixture thickens and turns a deep amber color. Add 1 pinch of sea salt flakes and stir until dissolved. Remove from heat and let it cool slightly; it should still be pourable but not runny. This is the trickiest step—if you overcook the caramel, it will become bitter and hard to pour. Watch the color carefully; it should resemble a rich, golden syrup.
- When the bars are done baking, remove them from the oven and let them cool completely in the pan on a wire rack. The bars will set as they cool. Once cooled, drizzle the warm salted caramel sauce evenly over the top, allowing it to pool slightly at the edges. The caramel should coat the bars like a glossy glaze, giving them a luxurious sheen. This step is pure magic—watch the caramel spread and feel the anticipation build.
- Slice the bars into squares using the parchment overhang to lift the entire pan. Serve immediately for the best texture, or refrigerate for up to 3 days. If refrigerating, let the bars come to room temperature before serving to ensure the caramel remains glossy. This final step is the grand finale—each slice should be a perfect balance of crust, filling, and caramel.
That's it — you did it. But hold on, I've got a few more tricks that'll take this to another level…
Insider Tricks for Flawless Results
The Temperature Rule Nobody Follows
Many bakers think 350°F is the sweet spot for cheesecake bars, but 325°F gives a gentler bake that keeps the filling silky without cracking. Lower temperatures also help the caramel set without burning. I once baked at 350°F and the bars cracked on the surface, so I switched to 325°F and the bars came out flawless.
Why Your Nose Knows Best
Smell the caramel as it cooks; it should emit a buttery, toasted sugar aroma. If it starts smelling like burnt sugar, pull it off the heat immediately. Your nose is the first line of defense against overcooked caramel.
The 5‑Minute Rest That Changes Everything
After baking, let the bars rest in the pan for exactly five minutes before moving them. This brief pause allows the filling to set fully and prevents the bars from sliding off the parchment. I used to rush the process and ended up with slanted bars.
Keep the Crust Crunchy
If you like a crunchier crust, sprinkle a thin layer of chopped pecans or walnuts over the crumb mixture before baking. The nuts add texture and a nutty flavor that pairs wonderfully with the caramel.
Seal the Edges
Before baking, lightly brush the edges of the crust with a beaten egg white. This seals the edges and prevents the crust from drying out or becoming too soft during baking.
Reheat Without Drying
To reheat refrigerated bars, place a small cup of water in the oven and bake at 300°F for 10 minutes. The steam keeps the bars moist and restores the caramel’s glossy sheen.
Creative Twists and Variations
This recipe is a playground. Here are some of my favorite ways to switch things up:
Maple‑Infused Bars
Replace the heavy cream in the caramel with 1 Tbsp of pure maple syrup. The maple adds a subtle depth of flavor that pairs beautifully with the apples. Serve with a drizzle of extra maple syrup for an extra sweet touch.
Chocolate‑Covered Delight
After the bars have cooled, dip half of each square in melted dark chocolate. The chocolate’s bittersweetness complements the caramel, creating a decadent treat that’s perfect for chocolate lovers.
Spiced Apple Variation
Add ½ tsp of ground ginger and a pinch of cloves to the apple mixture. The spices bring warmth and complexity, turning the bars into a fall‑season favorite.
Nutty Crunch Edition
Fold ¼ cup of chopped toasted almonds into the cheesecake filling. The almonds add a satisfying crunch and nutty flavor that contrasts with the creamy filling.
Berry‑Burst Surprise
Swap the apples for fresh blueberries and reduce the sugar by ¼ cup. The berries add a burst of tartness and a pop of color, making the bars look as good as they taste.
Vegan Version
Use coconut cream instead of cream cheese and replace eggs with flaxseed meal. The result is a vegan dessert that still delivers on texture and flavor, though the caramel sauce should be made with coconut sugar for a truly plant‑based experience.
Storing and Bringing It Back to Life
Fridge Storage
Store the bars in an airtight container in the refrigerator for up to 5 days. The caramel will set firmly, and the filling remains creamy. When you’re ready to serve, let the bars sit at room temperature for 15 minutes to soften slightly.
Freezer Friendly
For longer storage, wrap each bar individually in plastic wrap, then place them in a freezer bag. Freeze for up to 2 months. Thaw overnight in the refrigerator before serving. The caramel will stay glossy, and the filling will maintain its texture.
Best Reheating Method
Reheat refrigerated bars in a 300°F oven for 10 minutes, or microwave on medium for 20 seconds. Add a tiny splash of water before reheating to create steam, which helps the bars return to their original moisture level. This trick prevents the caramel from drying out and keeps the bars delicious.