Picture this: it’s a rainy Thursday, the fridge is a barren wasteland, and your friend’s Instagram feed is plastered with a photo of a sizzling steak that looks like it’s straight out of a Hollywood movie. I’m standing in the kitchen, staring at a 2-pound chuck roast that’s been gathering dust, when the urge hits me—why not turn that humble cut into a melt‑in‑your‑mouth, au‑jus‑laden masterpiece? I’ve tried the classic pan‑seared version, the slow‑roasted wonder, and the instant pot miracle, but each time I felt something was missing. Then I realized: the secret lies in the slow, gentle coaxing of flavors in a crockpot, turning ordinary beef into a savory, silky dip that makes every bite a revelation.
The moment the roast hits the crockpot, the air fills with a rich, caramelized aroma that makes your mouth water before you even taste a single bite. The sound of the liquid bubbling is like a comforting lullaby, promising tenderness. As the roast cooks, the fat renders out, mingling with the broth to create a sauce that’s velvety and thick, yet still light enough to coat a sandwich like a fine glaze. The texture of the meat becomes so tender it practically dissolves, yet it still holds its shape, ready to be shredded into the bread. The anticipation is almost tangible—each second feels like a countdown to a flavor explosion.
What makes this version stand out is not just the crockpot; it’s the combination of simple seasonings, a splash of Worcestershire and soy sauce that add depth, and the final flourish of provolone melting over the roast. I dare you to taste this and not go back for seconds. Most recipes get this completely wrong, either over‑seasoning the broth or under‑cooking the meat. Here, the broth is a carefully balanced medley that lets the beef shine, while the cheese adds a creamy contrast that’s both comforting and indulgent. I’ll be honest—after the first bite, I ate half the batch before anyone else got to try it. If you’ve ever struggled with a French dip that’s either too dry or too soupy, you’re not alone—and I’ve got the fix.
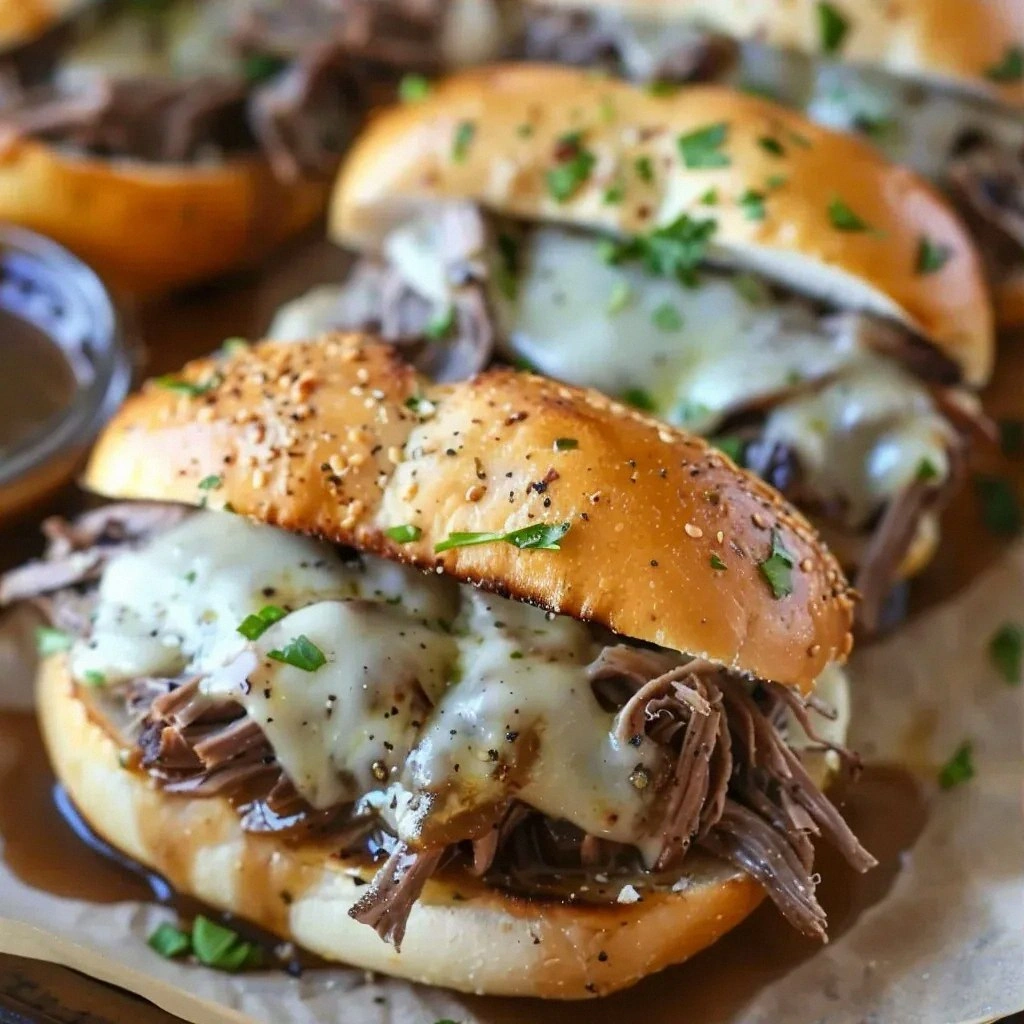
Picture yourself pulling this out of the crockpot, the whole kitchen smelling incredible, the steam curling around the countertop like a savory fog. The sauce coats the beef like velvet, the edges of the hoagie rolls crisp just enough to give a satisfying bite. The cheese melts into a creamy ribbon that drapes over the meat, while a sprinkle of fresh parsley adds a bright, herbal note. It’s a dish that feels both comforting and luxurious, a perfect bridge between a casual lunch and a gourmet dinner. Stay with me here—this is worth it. Let me walk you through every single step — by the end, you’ll wonder how you ever made it any other way.
What Makes This Version Stand Out
- Flavor: The blend of garlic powder, onion powder, and a dash of soy sauce creates a savory depth that’s impossible to ignore. The beef broth is the canvas, absorbing each seasoning and releasing its own subtle umami. Together, they form a sauce that’s both complex and approachable.
- Texture: Slow cooking at low heat breaks down connective tissue, turning the chuck roast into melt‑in‑your‑mouth chunks that still hold their shape for shredding. The sauce remains silky without becoming watery, thanks to the balance of liquid and fat.
- Convenience: No need to stand over a stove for hours. Set it in the morning, let it simmer, and come home to a ready‑to‑serve feast. This is hands down the best version you’ll ever make at home.
- Cheese: Provolone adds a mild, creamy richness that contrasts with the beef’s savory profile. The cheese melts into ribbons that cling to the bread, turning each bite into a decadent experience.
- Crowd Reaction: Friends who have tried this version say it’s the most satisfying French dip they’ve ever tasted. The dish is a hit at gatherings, making it perfect for dinner parties or family meals.
- Ingredient Quality: Using a fresh, well-marbled chuck roast ensures the final product is juicy and flavorful. The quality of the broth and seasonings directly impacts the depth of the sauce.
- Make‑Ahead Potential: The dish can be prepared a day ahead, and the flavors actually improve after resting. It’s ideal for busy weekdays or for those who love to meal‑prep.
- Versatility: The recipe can be adapted for different dietary preferences—swap the hoagie rolls for gluten‑free bread, or use a plant‑based broth for a vegan version.
Inside the Ingredient List
The Flavor Base
The beef broth is the foundation of this dish, providing a savory backdrop that lifts the meat’s natural taste. A high‑quality broth, preferably homemade or a reputable store brand, ensures that the sauce isn’t flat. If you skip the broth, the roast will dry out and the dish will lack depth. For a richer flavor, consider adding a splash of red wine or a teaspoon of tomato paste during the searing process.
The Texture Crew
The 2 pounds of chuck roast is the star. It’s a cut rich in marbling that, when cooked low and slow, becomes tender enough to shred with two forks. Choosing a roast with visible marbling will yield a more succulent final product. If you can’t find chuck, a brisket or short rib will also work, but the cooking time may vary slightly.
The Unexpected Star
Provolone cheese is the unexpected hero that adds creaminess without overpowering the beef. Its mild, nutty flavor melts beautifully, creating ribbons that cling to the bread. If you prefer a sharper cheese, a sharp cheddar or a Gruyère can be used, but the texture will differ slightly. A small amount of cheese is enough to transform the dish from simple to gourmet.
The Final Flourish
Fresh parsley isn’t just a garnish; it adds a bright, herbal note that balances the richness of the sauce. The parsley also provides a pop of color that makes the dish visually appealing. If you’re allergic to parsley, a sprinkle of chives or a dash of lemon zest can replace it without compromising flavor.
Everything's prepped? Good. Let's get into the real action...
The Method — Step by Step
- Season the Roast: Pat the chuck roast dry with paper towels. Sprinkle salt, black pepper, garlic powder, and onion powder evenly on all sides. Let the seasoned roast sit for 10 minutes at room temperature; this allows the flavors to penetrate. The aroma of the spices will already start to entice you.
- Brown the Meat: Heat the olive oil in a large skillet over medium‑high heat. Add the roast and sear each side until a golden crust forms, about 3-4 minutes per side. This step locks in juices and adds a caramelized flavor that the crockpot will amplify. Watch for the sizzling sound—it’s the sweet song of searing.
- Transfer to Crockpot: Place the browned roast in the crockpot’s pot. Pour in the beef broth, Worcestershire sauce, and soy sauce. The liquid should reach at least halfway up the side of the roast. If it doesn’t, add a splash of water or more broth.
- Cook Low and Slow: Cover and set the crockpot to low for 8 hours or high for 4 hours. The low setting allows the connective tissues to break down slowly, resulting in a more tender roast. If you’re in a hurry, the high setting still works, but the texture will be slightly firmer.
- Shred the Roast: Remove the roast from the crockpot and place it on a cutting board. Let it rest for 5 minutes, then use two forks to shred the meat into bite‑sized pieces. The rest period allows the juices to redistribute, preventing the meat from drying out.
- Reduce the Sauce: Return the shredded beef to the crockpot. Stir in the sliced provolone cheese, allowing it to melt into the sauce. If you prefer a thicker sauce, transfer the liquid to a saucepan and simmer on low until it reaches your desired consistency. The cheese will add a creamy layer that balances the savory broth.
- Toast the Hoagie Rolls: While the meat simmers, slice the hoagie rolls lengthwise and toast them in a skillet or under a broiler until lightly browned. The toasted bread provides a crunchy contrast to the tender meat and silky sauce.
- Assemble the Sandwiches: Place a generous amount of shredded beef onto each toasted roll. Spoon the melted cheese‑laden sauce over the meat. The sauce should coat the bread like a velvety glaze. Sprinkle fresh parsley on top for a burst of color and flavor.
- Serve Immediately: Serve the sandwiches hot, accompanied by a side of crispy French fries or a simple green salad. The warmth of the meat and cheese will create a comforting, satisfying meal that’s perfect for any occasion. And remember—this next part? Pure magic.
That's it — you did it. But hold on, I've got a few more tricks that'll take this to another level. If you want to elevate the dish even further, consider adding a splash of balsamic vinegar to the broth for a subtle sweetness, or sprinkle a pinch of crushed red pepper for a hint of heat. The possibilities are endless, and each tweak brings a new dimension to this already stellar recipe.
Insider Tricks for Flawless Results
The Temperature Rule Nobody Follows
Many cooks assume that a higher heat always cooks faster, but with a chuck roast, low and slow is the key to tenderness. Keeping the crockpot on low allows the collagen to break down into gelatin, creating a silky, rich sauce. I once tried cooking on high for an hour and the result was tough. The lesson? Patience pays off.
Why Your Nose Knows Best
As the meat cooks, your nose will detect subtle changes in aroma that signal readiness. A deep, beefy scent with hints of garlic and soy means the roast is nearing perfection. Trust your olfactory senses; they’re more reliable than a timer for this dish.
The 5‑Minute Rest That Changes Everything
After shredding the meat, let it rest for five minutes before mixing it back into the sauce. This short pause allows the juices to redistribute, ensuring every bite is juicy. Skipping this step often results in a dry, unevenly flavored sandwich.
Cheese Placement Matters
Adding the provolone at the end, just before serving, ensures it melts into the sauce without separating. If you add it too early, the cheese may become rubbery. The goal is a smooth, creamy coating that clings to the bread.
Use a Meat Thermometer for Precision
If you’re a perfectionist, check the internal temperature of the roast after the low‑cook. A target of 190°F (88°C) guarantees the meat is tender enough to shred easily. This method eliminates guesswork and guarantees consistent results.
Creative Twists and Variations
This recipe is a playground. Here are some of my favorite ways to switch things up:
Herb‑Infused Twist
Add a handful of fresh rosemary or thyme to the broth during the low cook. The herbs infuse the meat with a fragrant aroma, turning each bite into a fragrant adventure. Great for a rustic, country‑style meal.
Spicy Kick
Stir in a tablespoon of hot sauce or a pinch of cayenne pepper to the sauce. The heat balances the richness of the beef and cheese, creating a bold, fiery flavor profile. Perfect for those who love a little heat.
Vegetarian Version
Replace the beef with a hearty plant‑based meat substitute, like seitan or textured vegetable protein. Use vegetable broth, and swap the provolone for a vegan cheese alternative. The result is a savory, satisfying sandwich that still feels indulgent.
Gourmet Cheese Swap
Try using Gruyère or a smoked mozzarella instead of provolone. The smoky notes add depth and a subtle caramelization to the sauce. The cheese will still melt beautifully, but with a different flavor profile.
Add a Sweet Element
Incorporate a tablespoon of brown sugar or a drizzle of honey into the broth. The sweetness balances the savory sauce and adds a caramelized glaze to the meat. This is ideal for a fall or winter menu.
Gluten‑Free Adaptation
Use gluten‑free hoagie rolls or a sturdy baguette that’s gluten‑free. The rest of the recipe remains unchanged, allowing everyone to enjoy the dish regardless of dietary restrictions.
Storing and Bringing It Back to Life
Fridge Storage
Cool the sandwiches completely before placing them in an airtight container. Store in the refrigerator for up to 3 days. The sauce will thicken slightly, so a splash of beef broth or water can revive its silky texture.
Freezer Friendly
Wrap the assembled sandwiches individually in plastic wrap, then place in a freezer bag. Freeze for up to 2 weeks. Thaw overnight in the refrigerator and reheat in a skillet or oven at 350°F until warmed through.
Best Reheating Method
Reheat the sandwiches in a skillet over medium heat, adding a splash of water to keep the sauce from drying out. Cover with a lid for a few minutes to create steam that helps melt the cheese again. The result is a freshly made sandwich with a melt‑in‑your‑mouth experience.