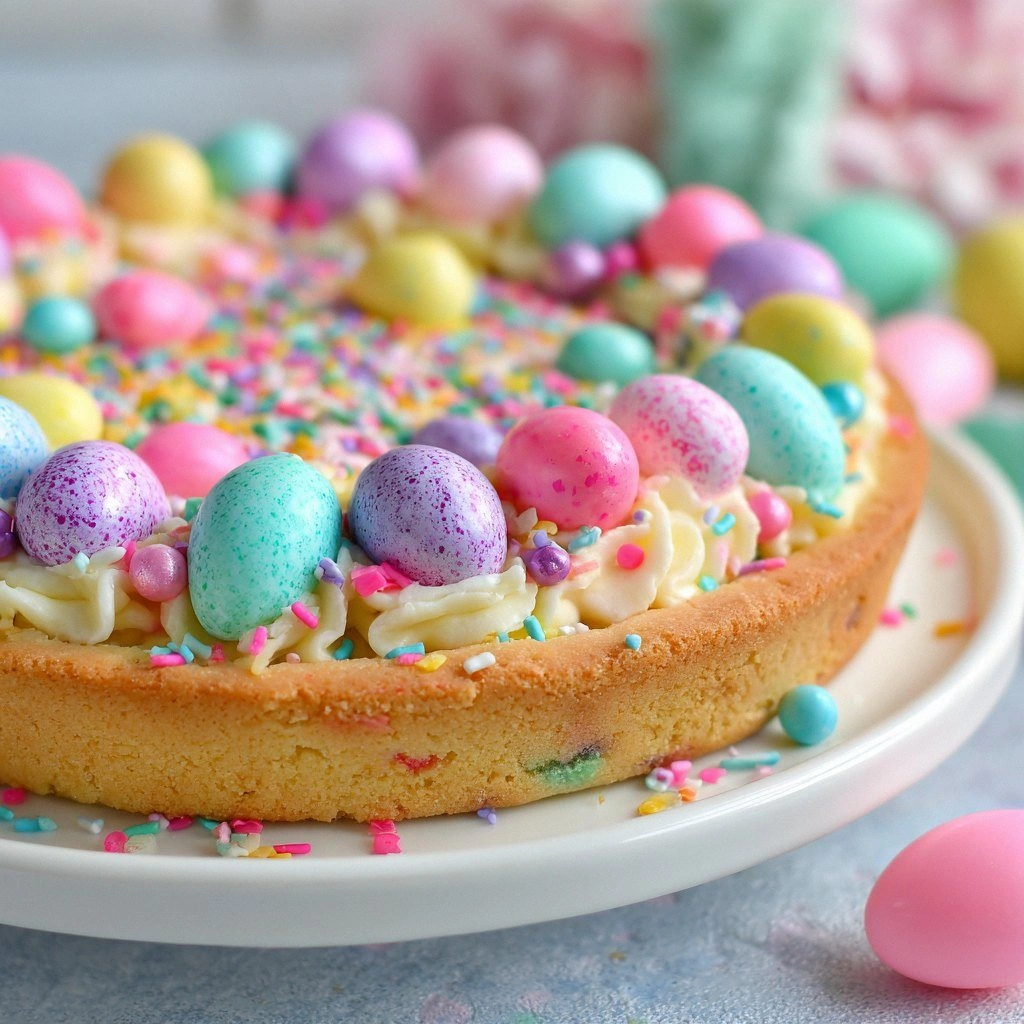
Picture this: a Saturday afternoon, the kitchen buzzing with the clatter of pans, a stack of sugar cookies on the counter, and a sudden realization that the pie crust is the missing puzzle piece. I stared at the half‑baked dough, the sweet scent of vanilla drifting through the air, and thought, “If only I had a cookie‑pie hybrid that didn’t require a separate crust.” That was the spark that lit the fire behind the Easter Sugar Cookie Pie : Soft, a recipe that marries the buttery, chewy texture of a classic sugar cookie with the comforting, flaky goodness of a pie. I’ve spent years tweaking cookie recipes, but this one is a revelation—soft, airy, and bursting with spring colors. It’s the kind of dessert that turns an ordinary Sunday into a celebration.
From the moment the dough hits the oven, you’ll hear that unmistakable crackle as the edges begin to lift, a sound that says the cookie is turning into a pie. The aroma that follows is a sweet, buttery perfume that wafts through the kitchen, mingling with the faint citrusy note of lemon zest and the subtle floral hint from the pastel food colors. When you take the first bite, the texture is a dream: a soft, pillowy center that gives way to a crisp, caramelized top, like a cloud that has kissed the sun. It’s not just a dessert; it’s an experience that engages all five senses, from the gentle crunch of sprinkles to the silky melt of butter in your mouth.
Most cookie‑pie hybrids I’ve tried in the past ended up either too dense or too dry, but this version stands out for its balance. I dared myself to experiment with a touch of almond extract and a splash of milk, which added depth without compromising the cookie’s signature chewiness. The result? A pie that’s as elegant as it is indulgent, with a soft crumb that feels like a cloud and a crust that’s buttery buttery and golden. If you’ve ever struggled with pie crusts that never rise, you’ll find this one forgiving and reliable. This is hands down the best version you'll ever make at home.
Now, I know you’re probably wondering what makes this recipe so special. It’s not just the ingredients; it’s the technique, the timing, and the little secrets that I’ve gathered over countless baking sessions. Picture yourself pulling this out of the oven, the whole kitchen smelling incredible, the pie glistening with a subtle sheen of glaze, and the sprinkles shimmering like fresh snow. I’ll walk you through every single step, from mixing the dough to glazing the finished pie, and by the end, you’ll wonder how you ever made it any other way. Let’s dive in.
What Makes This Version Stand Out
- Texture: The dough is engineered to be soft enough to hold its shape yet tender enough to melt in your mouth. The trick is the precise ratio of butter to flour and a short mixing time.
- Flavor: A splash of almond extract and a whisper of lemon zest elevate the sweetness, giving the pie a nuanced, almost citrusy undertone that balances the buttery richness.
- Color: Pastel food coloring gives the pie a vibrant, Easter‑like appearance without overwhelming the natural cookie flavor.
- Ease: No pre‑baked crust required. The dough itself doubles as the crust, saving time and effort while still achieving a flaky, golden edge.
- Make‑Ahead: The pie can be assembled up to 24 hours before baking, thanks to the dough’s forgiving nature. This is perfect for busy hosts.
- Crowd‑Pleaser: The combination of soft cookies, crunchy sprinkles, and a glossy glaze makes it a showstopper at any gathering.
Inside the Ingredient List
The Flavor Base
All-purpose flour is the backbone of this recipe. It provides structure while remaining light enough to keep the cookie airy. Using a high‑protein flour can make the dough too dense, so I recommend a standard all-purpose blend. If you’re feeling adventurous, try substituting half the flour with cake flour for an even softer crumb. A pinch of sea salt balances the sweetness, preventing the sugar from overpowering the buttery notes.
The Texture Crew
Unsalted butter is the star that gives the pie its melt‑in‑your‑mouth quality. Softened to room temperature, it blends seamlessly with the sugar, creating a silky batter that coats the flour. The eggs act as a binder, ensuring the dough holds together without becoming tough. I use two large eggs; if you’re making a larger batch, you can scale up proportionally. The addition of milk adds moisture and helps achieve a slightly lighter texture.
The Unexpected Star
Almond extract is the secret that elevates this pie from ordinary to extraordinary. Just a teaspoon adds a nutty depth that complements the buttery base. If you’re vegan or allergic, you can replace it with a few drops of vanilla or omit it entirely—the pie still turns out delicious. Lemon zest provides a bright, citrusy contrast to the rich sweetness, cutting through the heaviness with a fresh pop.
The Final Flourish
For the glaze, powdered sugar is essential for that glossy finish that makes the pie look like a confectionery masterpiece. Vanilla extract and a splash of milk create a smooth, pourable glaze that clings to the top without dripping. Sprinkles add a playful texture and a splash of color that makes the pie visually stunning. If you’re feeling fancy, drizzle a thin line of melted dark chocolate over the top for a bittersweet contrast.
Everything’s prepped? Good. Let’s get into the real action.
The Method — Step by Step
- Preheat and Prep: Preheat your oven to 350°F (175°C). While the oven warms, line a 9-inch pie dish with parchment paper, leaving an overhang for easy removal later. This step is crucial for a clean release and prevents the crust from sticking.
- Mix Dry Ingredients: In a medium bowl, whisk together 2 cups of all-purpose flour, 1 teaspoon of baking powder, and 1 teaspoon of sea salt. The dry mix ensures even distribution of leavening agents, preventing uneven rising. I always sift the flour to avoid clumps, which could ruin the texture.
- Cream Butter and Sugar: In a stand mixer fitted with the paddle attachment, beat 1 cup of softened unsalted butter with 1 cup of granulated sugar until light and fluffy—about 3 minutes. The goal is to incorporate air, which contributes to the soft crumb. If you’re short on time, a handheld mixer will do, but be careful not to over‑mix.
- Add Eggs and Extracts: Beat in 2 large eggs, one at a time, followed by 2 teaspoons of vanilla extract and 1 teaspoon of almond extract. The gradual addition ensures a smooth batter. The almond extract adds a subtle nutty flavor that elevates the overall profile.
- Combine Wet and Dry: Gradually fold the dry mixture into the wet batter, alternating with 1/2 cup of milk. Use a spatula for a gentle fold to keep the batter airy. The milk adds moisture, making the dough pliable enough to press into the pie dish without tearing.
- Color the Dough: Divide the dough into equal portions and add a few drops of pastel food coloring to each. Knead lightly until the color is evenly distributed. This step turns the dough into a vibrant, Easter‑ready canvas.
- Press into the Dish: Transfer the colored dough into the prepared pie dish, pressing it evenly to the bottom and up the sides. Use a flat spatula to smooth the surface. This ensures a uniform thickness, which is key for even baking.
- Bake the Base: Place the pie in the preheated oven for 25 minutes, or until the edges are golden brown and the center is set. The baking time can vary slightly depending on your oven, so keep an eye on the crust. The golden crust is a sign that the dough has achieved the perfect balance of softness and structure.
- Cool and Glaze: Let the pie cool on a wire rack for 10 minutes. While it cools, whisk together 1 cup of powdered sugar, 1 teaspoon of vanilla extract, and a tablespoon of milk to create a glaze. Drizzle the glaze over the warm pie, letting it pool in the corners for a glossy finish. The glaze sets quickly, so be swift.
- Decorate: Sprinkle a generous amount of 1 cup of colorful sprinkles over the glazed surface. The crunch adds texture and a playful visual element. If you like, add a light dusting of powdered sugar for a dusted finish.
- Serve: Slice the pie into wedges and serve at room temperature. The soft center will melt slightly in your mouth, creating a delightful contrast with the crisp glaze. This is the moment of truth—taste it and feel the magic.
That’s it— you did it. But hold on, I’ve got a few more tricks that’ll take this to another level. Let’s explore the insider secrets that will make your pie flawless every time.
Insider Tricks for Flawless Results
The Temperature Rule Nobody Follows
Many bakers assume that a higher oven temperature guarantees a crispier crust. In reality, a steady 350°F (175°C) is the sweet spot for this pie. It allows the butter to melt slowly, creating steam pockets that puff the dough without burning the edges. I’ve tried 375°F once, and the result was a hard, cracked top that didn’t have the same airy quality.
Why Your Nose Knows Best
When the pie starts to bake, you’ll notice a faint scent of caramelized sugar. That’s the signal that the edges are getting golden. If the smell is too sweet or the crust is darkening too quickly, pull it out early. My friend once left it in the oven for 35 minutes, and the result was a burnt crust that ruined the entire pie.
The 5-Minute Rest That Changes Everything
After removing the pie from the oven, let it rest for exactly five minutes before glazing. This pause allows the steam to settle, creating a smooth surface for the glaze to adhere. Skipping this step can result in a glaze that flakes off when you try to slice the pie.
The Right Mix of Butter and Sugar
Using butter that’s at room temperature is essential; cold butter will create a denser texture, while melted butter can make the dough too greasy. I always double‑check the temperature with a simple test: press the butter with your finger; it should give without breaking. If you’re short on time, you can use a mix of butter and coconut oil for a slightly different flavor profile.
Sprinkle Placement for Visual Impact
Rather than dumping all the sprinkles in a single layer, I spread them in a circular pattern around the glaze. This not only looks more appealing but also ensures each bite gets a crunch. If you’re making a large batch, consider using a silicone mold to keep the sprinkles evenly distributed.
Make‑Ahead Tip
The dough can be assembled and refrigerated up to 24 hours before baking. This is perfect for holiday gatherings or when you’re short on time. Just cover the pie with plastic wrap and let it sit in the fridge. When you’re ready to bake, let it sit at room temperature for 15 minutes before placing it in the oven.
Creative Twists and Variations
This recipe is a playground. Here are some of my favorite ways to switch things up:
Chocolate‑Covered Delight
Swap the vanilla glaze for melted dark chocolate and drizzle it over the cooled pie. Add a sprinkle of sea salt on top for a sweet‑savory contrast that’s sure to wow guests.
Berry Burst Edition
Incorporate fresh blueberries or raspberries into the dough before baking. The fruit adds a burst of tartness that pairs beautifully with the buttery base.
Nutty Crunch Variation
Add chopped toasted pecans or walnuts to the dough. The crunch adds texture and a nutty flavor that complements the almond extract.
Citrus Twist
Replace the almond extract with orange zest and use a citrus‑infused glaze made with orange marmalade. The bright, zesty flavor cuts through the richness of the pie.
Vegan Version
Use plant‑based butter, flaxseed eggs, and coconut milk instead of dairy. The texture remains soft, and the flavor profile stays deliciously sweet.
Gluten‑Free Adaptation
Swap the all‑purpose flour for a gluten‑free blend that contains xanthan gum. The dough will hold together well, and the final product will still be tender and chewy.
Storing and Bringing It Back to Life
Fridge Storage
Store the cooled pie in an airtight container at room temperature for up to 2 days. If you need to keep it longer, wrap it tightly in plastic wrap and refrigerate for up to 3 days. The glaze may firm up slightly, but it will soften when you let it sit at room temperature for 15 minutes.
Freezer Friendly
For longer storage, freeze the pie for up to 2 weeks. Wrap it in parchment paper, then in aluminum foil, and place it in a freezer bag. When ready to serve, thaw overnight in the refrigerator, then let it sit at room temperature for 30 minutes before slicing.
Best Reheating Method
Reheat the pie in a preheated oven at 300°F (150°C) for 10 minutes. Add a splash of water to the bottom of the pan to create steam, which keeps the crust moist. After reheating, let the pie cool for a few minutes before glazing again if desired.