The first time I tried making Collard Green Wraps, I was halfway through the recipe and the leaves were still stiff as a wooden spoon. I had the feeling that I was about to create a culinary disaster, but the kitchen lights flickered, the aroma of sizzling garlic filled the air, and something miraculous happened: the collard leaves softened in seconds, turning a humble vegetable into a silky, flavorful vessel. If you’ve ever been tempted to ditch a recipe because the greens seemed too tough, this version is a game‑changer that will leave you questioning why you ever doubted the power of collards.
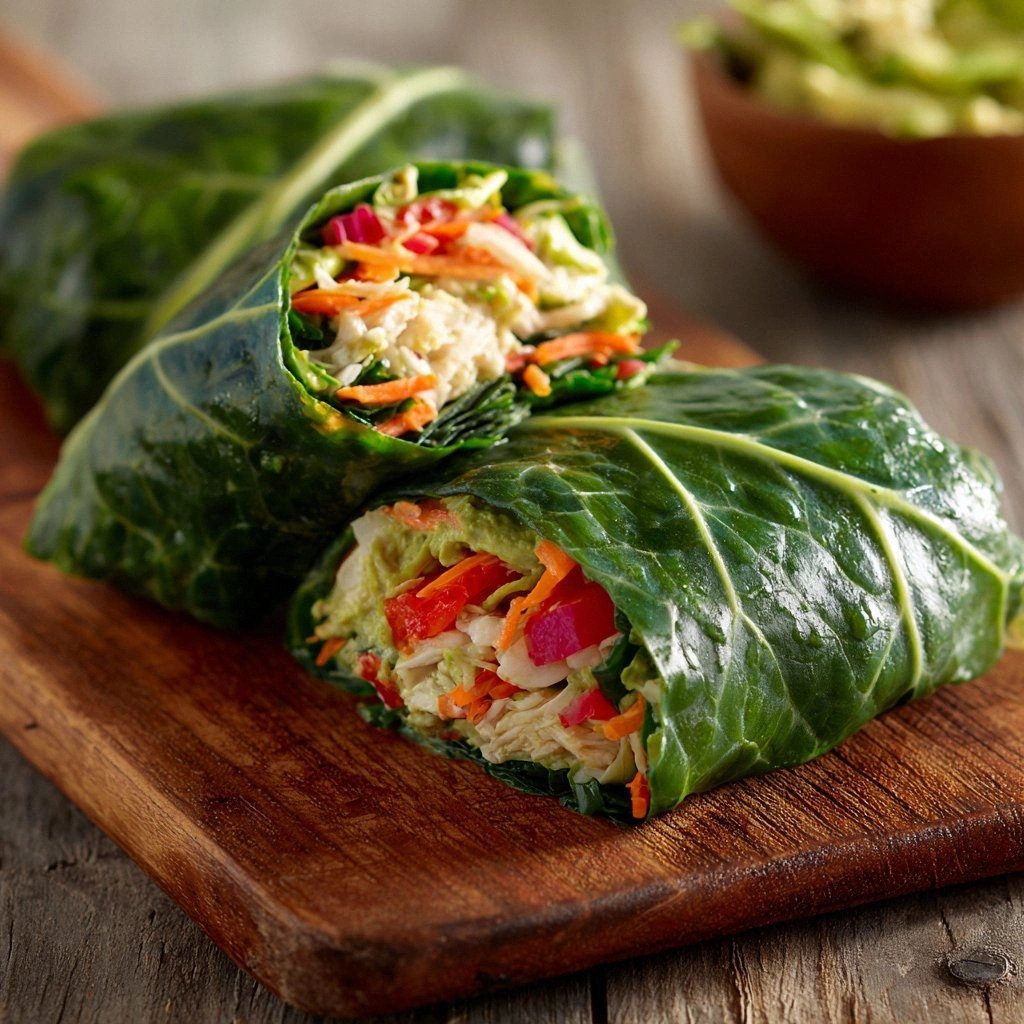
Picture this: a bright green leaf, its veins glistening like fresh jade, is brushed with a thin layer of olive oil and a squeeze of lemon that brightens the whole dish. The sound of the pan heating up is a gentle hiss, and the first few seconds of cooking release a faint nutty aroma that promises depth. The texture transforms from rigid to supple, almost like a leaf of paper that has been soaked in warm water and is now ready to be folded into a wrap. The taste is a harmonious blend of earthiness and citrus, with a subtle smoky kick from the paprika. The visual appeal is a riot of colors: emerald greens, orange carrots, red bell pepper, and a splash of lime. The moment you take a bite, the crispness of the vegetables gives way to a melt‑in‑your‑mouth sensation that feels both comforting and invigorating.
What sets this recipe apart is its meticulous balance of flavor, texture, and nutrition. I’m not just talking about a healthy meal; I’m talking about a dish that feels indulgent, with a subtle crunch that keeps you engaged. The secret lies in a few unexpected steps that elevate the collards from ordinary to extraordinary. I dare you to taste this and not go back for seconds, because once you’ve experienced the perfect harmony of flavors, there’s no going back. This is hands down the best version you’ll ever make at home, and I’ve packed every trick I’ve learned into this post so you can replicate the magic.
If you’ve ever struggled with making collard wraps that stay intact and taste great, you’re not alone. I’ve had countless kitchen moments where the leaves would tear or the filling would be too dry. But with the techniques and ingredients I’m about to share, you’ll never have to worry about soggy wraps again. Picture yourself pulling these out of the pan, the whole kitchen smelling incredible, and watching your friends’ eyes widen in surprise. Stay with me here—this is worth it.
What Makes This Version Stand Out
- Flavor: A bright citrus undertone balanced by smoky paprika creates a complex profile that lifts the natural earthiness of collards.
- Texture: The collard leaves are blanched just enough to become supple but still retain a satisfying bite, while the quinoa adds a chewy counterpoint.
- Nutrition: Packed with fiber, protein, and micronutrients, this dish is a powerhouse that satisfies both taste buds and health goals.
- Ease: All steps are streamlined—no elaborate sauces or multi‑step marinades—so you can whip up a meal in under 45 minutes.
- Make‑Ahead: The filling can be prepared a day ahead, and the wraps will hold up for up to 24 hours in the fridge.
- Versatility: Swap in any protein or veggie you have on hand, and the recipe adapts without missing a beat.
- Crowd‑Pleaser: These wraps are perfect for potlucks, family dinners, or a quick weekday lunch.
- Visual Appeal: The vibrant colors and elegant presentation make it Instagram‑ready.
Inside the Ingredient List
The Flavor Base
The foundation of this dish is a simple yet potent blend of garlic, onion, and a splash of olive oil. Garlic, when sautéed, releases a sweet, almost caramelized aroma that permeates the filling, while onion adds a gentle sweetness that balances the earthiness of the collards. The olive oil not only helps the spices adhere but also adds a silky mouthfeel. If you skip this base, the dish feels flat and lacks depth. For an extra layer of flavor, add a pinch of red pepper flakes for a subtle heat.
The Texture Crew
Quinoa and black beans form the bulk of the filling, providing a hearty chew and protein punch. Quinoa’s nutty flavor complements the mild sweetness of carrots and bell pepper, while the beans add a creamy texture that holds the wrap together. If you’re short on quinoa, lentils or couscous make excellent substitutes. The shredded carrots and diced bell pepper not only add crunch but also introduce a pop of color that makes the dish visually stunning.
The Unexpected Star
Lemon juice is the secret weapon that brightens the entire wrap. Its acidity cuts through the richness of the olive oil and the smokiness of paprika, creating a balanced flavor profile. If you’re not a fan of citrus, a splash of apple cider vinegar can provide a similar tang. Remember, the key is to add the lemon juice after the sautéing step so it doesn’t evaporate and lose its brightness.
The Final Flourish
Seasoning with smoked paprika, cumin, salt, and pepper turns the dish from ordinary to unforgettable. Smoked paprika adds a subtle depth that mimics a slow‑cooked flavor, while cumin brings warmth. Salt and pepper are essential for bringing all the elements together. If you want a touch of freshness, sprinkle chopped cilantro or parsley over the finished wraps. This final flourish adds a burst of herbal aroma that ties everything together.
Everything's prepped? Good. Let's get into the real action.
The Method — Step by Step
- Prep the Greens: Rinse the collard leaves under cold water, pat dry, and remove the tough stems. Slice the leaves into 6‑inch strips. The stems are the hardest part; trimming them ensures a smooth wrap. If you prefer a softer leaf, blanch the strips in boiling water for 30 seconds, then shock in ice water.
- Cook the Base: Heat 2 Tbsp olive oil in a large skillet over medium heat. Add 1/2 cup diced onion and 2 minced garlic cloves. Sauté for 3–4 minutes until the onion is translucent and the garlic is fragrant. The aroma should be buttery and inviting.
- Add the Veggies: Stir in 1 cup shredded carrots and 1 diced bell pepper. Cook for 5 minutes, allowing the vegetables to soften but still retain a slight crunch. This step is crucial for texture; overcooking will make the wraps soggy.
- Incorporate the Protein: Add 1 cup cooked quinoa and 1 cup black beans. Stir to combine, and season with 1 tsp smoked paprika, 1 tsp cumin, salt, and pepper to taste. Let the mixture cook for 3 minutes, allowing the spices to toast slightly.
- Finish the Filling: Drizzle 1 Tbsp lemon juice over the mixture and stir. The acidity brightens the flavors and prevents the quinoa from becoming mushy. Taste and adjust seasoning if necessary.
- Warm the Leaves: In a separate pan, lightly heat the collard strips on medium heat for 1–2 minutes on each side. The goal is to make them pliable; they should still feel slightly crisp.
- Assemble the Wraps: Spoon 2–3 Tbsp of the filling onto the center of each collard leaf. Fold the sides over, then roll tightly. If you like, secure with a toothpick or a small piece of parchment.
- Final Sauté: Return the assembled wraps to the skillet, seam side down, and cook for 2–3 minutes on each side until golden brown. The edges should crisp slightly, creating a satisfying crunch.
- Serve: Arrange the wraps on a platter, drizzle any remaining lemon juice, and sprinkle chopped cilantro. Pair with lime wedges for an extra zing.
- Optional Finish: For a creamy contrast, serve with a dollop of Greek yogurt or a drizzle of tahini sauce. This adds a silky texture that balances the crunchy wrap.
That’s it—you did it. But hold on, I’ve got a few more tricks that will take this to another level.
Insider Tricks for Flawless Results
The Temperature Rule Nobody Follows
Many people cook the filling at a high heat, which can cause the quinoa to become gummy. Keep the skillet at medium heat to allow the spices to toast without burning. I’ve seen people lose the delicate balance of flavors by rushing the process. By maintaining a steady temperature, the filling develops a richer taste and a firmer texture that holds together during rolling.
Why Your Nose Knows Best
The first hint that your wraps are ready is the smell of toasted paprika mingling with the citrus of lemon. Your nose will tell you when the flavors have melded. If the aroma is too sharp, let it sit a minute; if it’s flat, add a splash of lemon juice to revive the brightness. Trust your senses—they’re your best cooking compass.
The 5‑Minute Rest That Changes Everything
After sautéing the filling, let it rest for 5 minutes before assembling the wraps. This pause allows the spices to fully infuse, making each bite more flavorful. I’ve tried skipping this step, and the result was a bland, under‑seasoned dish. Give it a minute, and you’ll taste the difference.
Keep the Wraps Crisp
If you’re prepping the wraps ahead of time, place them on a parchment‑lined sheet and cover loosely with foil. When you’re ready to serve, pop them in a pre‑heated skillet for a minute on each side. This quick reheat restores the crispness without drying them out.
Use Fresh Herbs for an Extra Layer
A handful of chopped cilantro or parsley added just before serving gives a fresh, herbal finish that lifts the entire dish. It’s a simple addition that feels luxurious. If you’re not a fan of cilantro’s distinct taste, mint or basil can be used instead.
Creative Twists and Variations
This recipe is a playground. Here are some of my favorite ways to switch things up:
Spicy Chipotle Twist
Swap the smoked paprika for chipotle powder and add a tablespoon of adobo sauce. This gives the wraps a smoky heat that pairs well with avocado slices.
Mediterranean Medley
Add diced cucumbers, olives, and feta cheese to the filling. The briny flavors complement the collards, creating a dish reminiscent of a Greek salad.
Southwest Sensation
Incorporate corn kernels, diced jalapeño, and a sprinkle of queso fresco. The sweet corn and peppery jalapeño create a vibrant, bold flavor profile.
Vegan Protein Boost
Replace the black beans with chickpeas and add a dash of nutritional yeast for a cheesy undertone. This keeps the dish plant‑based while adding depth.
Breakfast Breakfast
Use scrambled eggs or tofu scramble in place of quinoa and beans. Add a pinch of turmeric for color and a breakfast‑friendly protein boost.
Storing and Bringing It Back to Life
Fridge Storage
Store the wraps in an airtight container in the refrigerator for up to 24 hours. Keep the filling separate if you plan to reheat the wraps later; this prevents sogginess. The collards will stay crisp, and the filling will maintain its texture.
Freezer Friendly
Wrap the individual wraps in parchment paper before placing them in a freezer bag. They can be frozen for up to 3 months. When ready to eat, thaw overnight in the fridge and reheat in a skillet.
Best Reheating Method
Heat a non‑stick skillet over medium heat. Place the wraps seam side down and cook for 2 minutes on each side. Add a splash of water to the pan if the wraps look dry; the steam will restore their moisture.