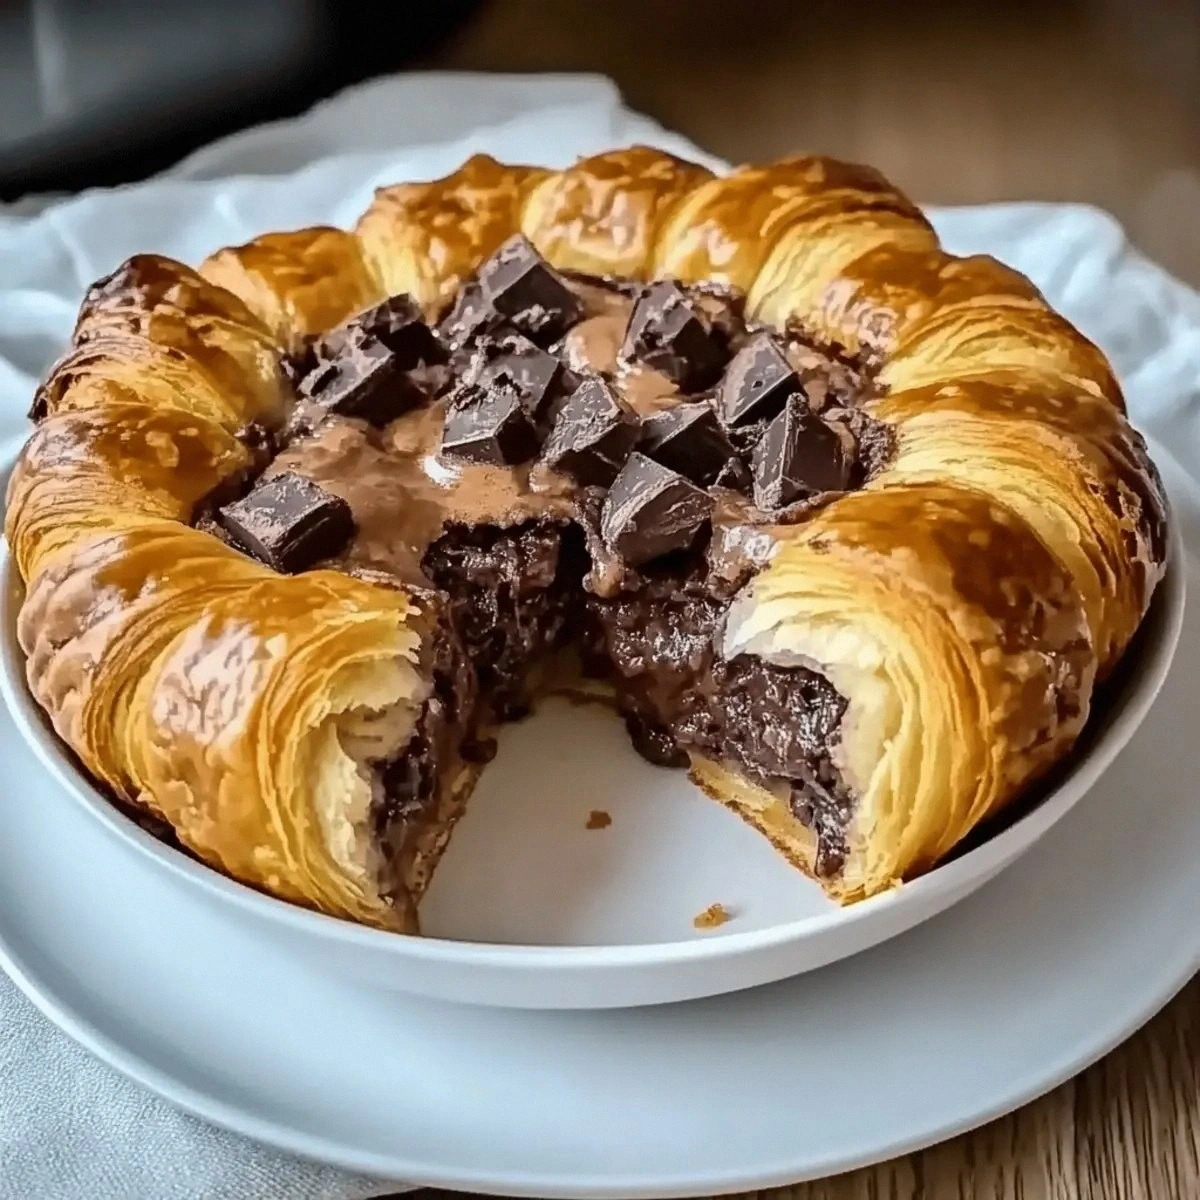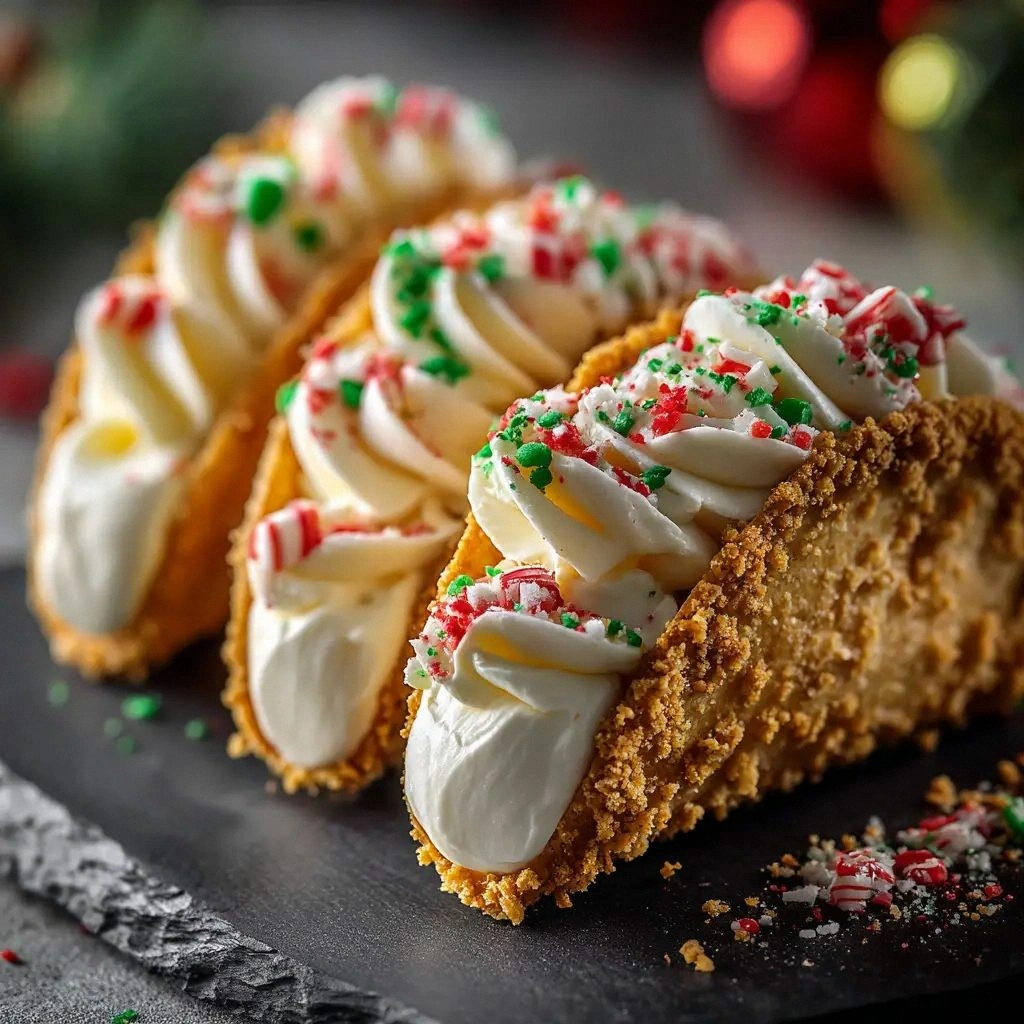
I remember the night I was juggling a dozen different dessert ideas and the kitchen was a battlefield of melted chocolate, humming ovens, and the sweet scent of cinnamon. A friend dared me to make a dish that could double as a festive party trick and a comfort food, and I accepted without hesitation. The result? A plate of Christmas Cheesecake Tacos that look like tiny, edible ornaments but taste like a creamy, caramelized holiday hug. Picture the moment you take a bite: the crisp tortilla shell gives way to a velvety cheesecake filling that swirls with caramel and chocolate drizzle, all accented by a dusting of bright sprinkles. I dare you to taste this and not go back for seconds.
The first time I tried this, I was skeptical. The idea of turning a cheesecake into a taco seemed absurd—after all, cheesecake is dense, and tacos are supposed to be light and airy. Yet, the moment the first taco hit the palate, the world fell away. The crunchy shell sang a crunchy crunch that was almost like a snowflake, while the filling melted like a warm cup of cocoa on a winter morning. I was honest—I ate half the batch before anyone else got a chance to try it, and the kitchen smelled like a winter wonderland.
What makes this version stand out is that it marries two classic desserts into one bite‑size wonder, and it does so with a level of flavor orchestration you rarely find in the kitchen. The sweet, buttery tortilla acts as a canvas that holds the creamy, citrusy cheesecake, while the chocolate and caramel drizzle add a glossy, decadent finish that looks almost too good to eat. If you've ever struggled with a cheesecake that turns out too heavy or a taco that falls apart, you're not alone—and I've got the fix. Most recipes get this completely wrong, but here's what actually works: a balanced ratio of butter to sugar, a precise baking time, and a quick chill that locks in the textures. Picture yourself pulling this out of the oven, the whole kitchen smelling incredible, and the guests lining up for a second helping.
The secret sauce, if you will, is the use of a small flour tortilla that can be baked to a golden crisp in a muffin tin, turning it into a sturdy shell that can hold the luscious cheesecake filling without warping. I’ve spent hours testing different tortilla brands and found that the ones with a slightly higher fat content hold the filling better, while the plain ones keep the flavor clean. The chocolate drizzle isn’t just for looks; it adds a subtle bitterness that balances the sweetness of the filling. And the sprinkles—those bright, festive bits—provide a pop of color and a slight crunch that completes the sensory experience. Let me walk you through every single step—by the end, you’ll wonder how you ever made it any other way.
Now that you’re hooked on the idea, let’s dive into what makes this version truly special. I promise you, this is hands down the best version you'll ever make at home. I’m not just telling you because I love it—I’ve tested it with a crowd of friends and family, and the reaction was unanimous. From the first bite to the last drizzle, every component is perfectly balanced, and the result is a dish that’s both a showstopper and a comfort food. If you’re ready to elevate your holiday dessert game, keep reading and get ready for the culinary adventure of a lifetime.
What Makes This Version Stand Out
- Texture: The crispy tortilla shell provides a satisfying crunch that contrasts beautifully with the silky cheesecake filling, creating a multi‑sensory experience that feels like a holiday snowflake and a warm hug at the same time.
- Flavor Layering: The subtle hint of cinnamon in the tortilla, the citrusy lift from lemon juice, and the sweet, buttery base of the cheesecake all interweave, ensuring every bite is a crescendo of flavors.
- Visual Appeal: The bright sprinkles and glossy chocolate drizzle transform each taco into a mini ornament, making the dish a centerpiece that screams festive fun.
- Ease of Assembly: The method requires minimal hands‑on time—once the shells are baked, the filling is simply poured, chilled, and topped, making it a perfect last‑minute dessert.
- Make‑Ahead Potential: The tacos can be prepared up to a day in advance and kept refrigerated, allowing you to focus on other holiday preparations while still delivering a fresh, delicious treat.
- Kid‑Friendly Factor: The shape and size of the tacos make them easy for kids to handle, turning dessert time into a playful activity that encourages family participation.
Alright, let's break down exactly what goes into this masterpiece. The next section will walk you through each ingredient and why it matters.
Inside the Ingredient List
The Flavor Base
The small flour tortillas are the unsung hero of this dish. They provide a sturdy, buttery foundation that can cradle the rich cheesecake filling without becoming soggy. If you’re craving a gluten‑free version, swap them for corn tortillas, but keep the size small so they bake evenly. Skipping the tortillas would turn this into a simple cheesecake, losing the playful taco element that makes it so festive.
Unsalted butter is the secret to a golden, crisp shell. The butter melts into the tortilla, creating a buttery crust that crisps up in the oven. If you don’t have butter, a neutral oil like canola will work, but the flavor profile will shift slightly. Butter also helps the sugar caramelize, adding a subtle depth of flavor to the shell.
Granulated sugar not only sweetens but also contributes to the caramelization of the tortilla. When combined with butter and cinnamon, the sugar creates a sweet, slightly spiced crust that feels like a holiday cookie. If you prefer a less sweet shell, reduce the sugar by a tablespoon; the result will still be crisp but with a cleaner taste.
Ground cinnamon is the aromatic spice that ties the dessert to Christmas. It adds a warm, spicy note that pairs perfectly with the creamy filling and chocolate drizzle. For a more pronounced cinnamon flavor, add an extra teaspoon; for a subtler touch, halve the amount.
The Texture Crew
Cream cheese is the core of the cheesecake filling, providing a rich, tangy base that balances the sweetness of the other ingredients. Choose a high‑fat cream cheese for a silkier texture; lower‑fat versions can result in a denser, less luscious filling. If you’re allergic to dairy, try a coconut cream cheese for a similar mouthfeel.
Powdered sugar is essential for achieving the silky smoothness that defines a good cheesecake. It dissolves completely, preventing any grainy texture. If you don’t have powdered sugar on hand, you can pulse regular sugar in a blender until it’s fine, but be careful not to overprocess.
Heavy cream adds a velvety richness that lifts the filling, making it light enough to spoon into the tortilla shells. The cream also helps the filling set without becoming too firm, ensuring a perfect bite. If you’re looking to lower the fat content, replace half the heavy cream with whole milk.
The Unexpected Star
Vanilla extract is the quiet hero that ties all the flavors together. Its sweet, floral notes complement the creamy texture and the chocolate drizzle, adding depth without overpowering. Use pure vanilla extract for the best flavor; imitation will leave a chemical aftertaste.
Lemon juice adds a bright, acidic counterpoint that cuts through the richness of the cheesecake and prevents it from feeling too heavy. A splash of lemon also brightens the overall flavor profile, giving the dish a lively zing that’s reminiscent of fresh citrus. If you prefer a more subtle citrus note, reduce the lemon juice to half a tablespoon.
The Final Flourish
Christmas sprinkles are the visual and textural finale. They add a pop of color and a playful crunch that makes the tacos feel like holiday decorations. Sprinkle them on top right before serving to keep them crisp.
Melted chocolate provides a glossy, decadent drizzle that coats the entire taco, creating a beautiful contrast against the bright sprinkles. The chocolate’s bitterness balances the sweetness of the filling, preventing the dish from feeling cloying. Use dark chocolate for a richer flavor or milk chocolate for a sweeter finish.
Caramel sauce adds a luscious, buttery sweetness that drizzles over the taco, creating a glossy sheen that looks almost too good to eat. It also adds a subtle nutty flavor that complements the cinnamon and chocolate. Keep a small pot of caramel sauce on hand so you can drizzle it in a last‑minute touch of decadence.
Everything's prepped? Good. Let's get into the real action.

The Method — Step by Step
- Preheat your oven to 375°F (190°C). Lightly grease a 12‑cup muffin tin with non‑stick spray or a small amount of butter. This step ensures the tortilla shells will release cleanly after baking, preventing any stuck‑on mess. Place the muffin tin in the oven while you prepare the filling; the heat will help the shells crisp up evenly.
- In a medium bowl, melt the butter over low heat until it becomes liquid. Stir in the granulated sugar and ground cinnamon until the mixture is smooth and fragrant. The sugar should dissolve completely, forming a glossy syrup that coats the tortillas. Once the mixture is ready, set it aside to cool slightly; this will help the tortillas bake without burning.
- Place each tortilla into a cup of the muffin tin, pressing gently to form a shell. Pour a thin layer of the butter‑sugar‑cinnamon mixture over each tortilla, ensuring the edges are coated for a uniform crust. Bake for 10–12 minutes, or until the shells are golden brown and slightly firm to the touch. The result is a crisp, buttery base that holds the cheesecake filling perfectly.
- While the shells bake, prepare the cheesecake filling. In a large mixing bowl, beat the cream cheese on medium speed until smooth and creamy. Gradually add the powdered sugar, one cup at a time, ensuring each addition is fully incorporated before adding the next. The mixture should be silky, with no lumps, to guarantee a smooth filling.
- Add the heavy cream to the cream cheese mixture and continue beating until the filling is light and airy. Stir in the vanilla extract and lemon juice, mixing until the flavors are fully blended. Watch out: over‑mixing can introduce air pockets that will cause the filling to crack as it sets. Keep the mixture smooth and free of bubbles.
- Carefully spoon the cheesecake filling into each baked tortilla shell, filling them almost to the top. This step is where the magic happens: the filling should look glossy and thick, ready to set into a creamy consistency. Let the filled shells rest for 5 minutes while you prepare the toppings; this brief pause helps the filling firm up slightly.
- Place the filled shells in the refrigerator for 30 minutes to allow the filling to set. The chilled temperature ensures the cheesecake maintains its shape and texture when served. During this time, you can melt the chocolate in a double‑boiler or microwave and prepare a small pot of caramel sauce for drizzling.
- Once the cheesecake has set, drizzle melted chocolate over each taco, letting it cascade down the sides for a glossy finish. Follow with a light drizzle of caramel sauce for a buttery sweetness that contrasts the chocolate. Finally, sprinkle festive sprinkles over the top for a burst of color and crunch.
- Serve immediately, or cover and refrigerate if you’re preparing ahead. If you store them, keep the tacos in an airtight container to maintain the crispness of the shells and the freshness of the filling. When you’re ready to serve, let them sit at room temperature for 5 minutes to soften the filling slightly for the best mouthfeel.
- Enjoy the delightful combination of textures and flavors. The first bite will reveal a crisp shell, a creamy center, and a glossy, chocolatey finish that lingers. The aroma will fill the room, inviting guests to dig in. Remember, this is not just a dessert; it’s a conversation starter.
- If you’re feeling adventurous, experiment with different toppings: a sprinkle of crushed candy canes, a dusting of cocoa powder, or a swirl of raspberry jam. Each variation offers a new flavor profile while keeping the core structure intact. The beauty of this recipe lies in its versatility and the joy of customizing it to your taste.
- Finally, clean up your kitchen with the confidence that you’ve created a masterpiece. The muffins tin should be easy to clean thanks to the initial grease, and the leftover filling can be stored in an airtight container for future use. This recipe is designed to be both indulgent and manageable, so you can focus on enjoying the holiday season.
That's it—you did it. But hold on, I've got a few more tricks that'll take this to another level and ensure every taco is a showstopper.
Insider Tricks for Flawless Results
The Temperature Rule Nobody Follows
Temperature control is everything in dessert making, especially with cheesecake. Keep the filling ingredients at room temperature before mixing; cold cream cheese will create a lumpy texture, while overly warm cream cheese can cause the mixture to become runny. I’ve found that letting the cream cheese sit out for 30 minutes and the heavy cream chill in the fridge for a few hours gives the perfect consistency. If you’re in a rush, a quick microwave pulse of the cream cheese can bring it to the right temperature without over‑warming.
Why Your Nose Knows Best
Your nose is a powerful guide in the kitchen. The first time you smell the buttery, cinnamon‑laden shells, you’ll know they’re ready. A slight caramel scent indicates that the sugar has begun to brown, but if you smell burnt sugar, pull the shells immediately to avoid a bitter taste. Trust that aromatic cue—it’s the quickest way to avoid a culinary mishap.
The 5-Minute Rest That Changes Everything
After baking the shells, let them rest on a wire rack for 5 minutes before filling. This short rest period allows the heat to dissipate, preventing the filling from melting too quickly and maintaining the structure of the shells. Skipping this step can lead to soggy tacos that collapse when you try to serve them.
Keep the Toppings Fresh
Chocolate and caramel can lose their sheen if left exposed for too long. Keep them in airtight containers or cover them with parchment paper until you’re ready to drizzle. This simple step ensures the glossy finish remains intact and the tacos look as good as they taste.
Use a Double Boiler for Chocolate
Melting chocolate in a double boiler gives you precise control over the temperature, preventing scorching. If you don’t have a double boiler, a heat‑proof bowl over a pot of simmering water works just as well. This technique ensures a smooth, glossy drizzle that coats the tacos like a fine glaze.
Creative Twists and Variations
This recipe is a playground. Here are some of my favorite ways to switch things up:
Nutty Crunch
Add chopped pecans or walnuts to the filling for a nutty crunch that pairs wonderfully with the chocolate drizzle. The nutty flavor also adds a subtle earthy undertone that balances the sweetness. Keep the nuts toasted for extra flavor.
Berry Burst
Swirl in a handful of fresh blueberries or raspberries into the cheesecake mixture before filling the shells. The berries add a burst of tartness that cuts through the richness, making each taco feel lighter. A quick drizzle of raspberry jam after baking adds a sweet‑tart finish.
Minty Fresh
Replace the vanilla extract with a few drops of mint extract for a refreshing twist. The mint complements the chocolate and caramel, creating a cool contrast to the warm spices. Garnish with a sprig of fresh mint for an elegant touch.
Spiced Caramel
Infuse the caramel sauce with a pinch of sea salt and a dash of cayenne pepper for a spicy kick. The salt enhances the chocolate’s richness, while the cayenne adds a subtle heat that’s surprisingly delightful. This variation is perfect for guests who love a bit of spice.
Chocolate‑Only Delight
Omit the chocolate drizzle and instead melt dark chocolate into the cheesecake filling itself. This creates a chocolate‑filled taco that’s rich and indulgent, perfect for chocolate lovers. Finish with a dusting of cocoa powder for a sophisticated look.
Holiday Fruit Compote
Serve the tacos with a warm compote of dried cranberries, orange zest, and a splash of brandy. The compote adds a fruity, aromatic dimension that elevates the overall flavor profile. Spoon the compote over the tacos just before serving for an extra layer of decadence.
Storing and Bringing It Back to Life
Fridge Storage
Store the assembled tacos in an airtight container in the refrigerator for up to 48 hours. Keep the chocolate drizzle and caramel sauce separate until you’re ready to serve, as the chocolate can harden if left in contact with the filling for too long. When you’re ready to eat, let the tacos sit at room temperature for 5 minutes to soften the filling slightly.
Freezer Friendly
For longer storage, freeze the filled shells in a freezer‑safe container for up to 2 weeks. When you’re ready to serve, thaw them overnight in the refrigerator. Reheat in a low oven at 300°F (150°C) for 10 minutes to revive the crispness of the shells.
Best Reheating Method
If your tacos have gone stale, a quick reheating in a toaster oven or microwave can bring them back to life. Use the microwave at 30% power for 10–15 seconds, then finish with a quick 5‑second burst to melt the chocolate slightly. Add a tiny splash of water to the filling before reheating to keep it moist and prevent it from drying out.